Compressing PNG images on Linux
PNG is short for Portable Network Graphic, a type of image file. It’s particularly popular file type with web designers and widely used on websites to display high-quality digital images because it can handle graphics with transparent or semi-transparent backgrounds. PNG files, which use the .png extension, can handle 16 million colors - which definitely sets them apart from most file types.
Compression reduces the file size to save disk space for easier and faster transmission over a network. PNG files are high quality and often take up a lot of space. For websites, containing PNG images, compression will positively affect the content loading time.
When exporting a PNG file, a pre-compression (filtering) and compression (DEFLATE) are done. Unlike JPEG files, PNGs use lossless compression, i.e., compression doesn’t impact image quality as it reduces the file size by optimizing it. If you’re looking to heavily compress your PNG images, you can use lossy methods to reduce the file size even more. We are going to introduce one Linux tool for each compression way.
Lossless compression
The quality of the image will be kept the same after lossless compression. With lossless compression when exporting your image, the file size reduction typically isn’t that great. In size, you’re typically looking at a 0-10% reduction.
Installing OptiPNG
First you need to update your system packages information:
sudo apt-get update
Then, install OptiPNG using apt package manager:
sudo apt install optipng
To optimize PNG files, execute the command below:
optipng *.png -o1
You can choose a single file providing directly the name or all the files using special asterisk (*) character. Appending .png we make sure to only select files with PNG extension. The behavior for optimization level (-o parameter) and the default value may change across different program versions.
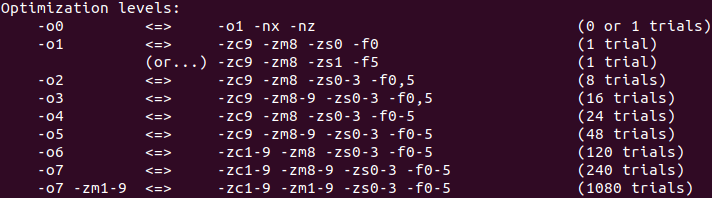
Use the option -h to see the details pertaining to your specific version.
Lossy compression
Changing your color depth from 16 million colors (24-bit) to 256 colors (8-bit) can reduce the file size by 50% or more. But this comes at a loss of image quality, that's why it is called lossy compression. Sometimes the difference is noticeable, sometimes it's not.
Installing pngquant
First you need to update your system packages information:
sudo apt-get update
Then, install pngquant using apt package manager:
sudo apt install pngquant
To optimize PNG files, execute the command below:
pngquant --speed 3 image.png -o image-out.png
The --speed parameter defines the speed/quality trade-off: from 1 (brute-force) to 10 (fastest). The default is 3. Speed 10 has 5% lower quality, but is 8 times faster than the default.
You can skip the output filename (-o parameter). A predefined string will be added to the original file name when generating the compressed file. The following combination will convert and replace original PNG files with compressed ones:
pngquant --speed 3 *.png --ext .png --force
Instead of choosing a single file providing the name, we've used special asterisk (*) character. Appending .png we make sure to only select files with PNG extension.


0 Comments