Configuring multiple websites on a single Nginx server
Nginx is a powerful and lightweight web server that's commonly used to serve websites and static content. If you're running several websites on a single machine, configuring Nginx to manage them properly is efficient and straightforward. This article walks you through installing Nginx, setting up multiple sites, configuring firewall access, and organizing your folders and logs in a clean and practical way.
Installing Nginx
First, you need to get Nginx installed and confirm that it's working correctly.
On Ubuntu or Debian-based systems:
sudo apt update
sudo apt install nginx
On CentOS or Fedora:
sudo yum install nginx
After installation, Nginx should start automatically.
Checking Nginx status
After installation, verify that Nginx is running by checking its service status:
sudo systemctl status nginx
If it's not running, start it manually:
sudo systemctl start nginx
To apply changes or restart Nginx, use this command:
sudo systemctl restart nginx
Point your browser to your server’s IP address to confirm it’s serving the default Nginx welcome page. That’s a quick way to know the server is up and responding to HTTP requests.
Configuring the firewall
If your server has a firewall (like UFW on Ubuntu), you'll need to allow traffic to Nginx. There are three built-in profiles you can use:
Nginx HTTP: opens only port 80 (regular HTTP)Nginx HTTPS: opens only port 443 (HTTPS)Nginx Full: opens both 80 and 443
To allow just HTTP:
sudo ufw allow 'Nginx HTTP'
To allow both HTTP and HTTPS:
sudo ufw allow 'Nginx Full'
Then enable the firewall if you haven't already:
sudo ufw enable
And verify that the rule is active:
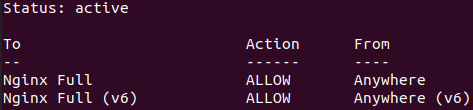
sudo ufw status
 You should see something similar to the image above showing
 Nginx Full allowed, which means both HTTP (port 80) and HTTPS (port 443) traffic are open and permitted through the firewall.
Organizing Nginx files and directories
Keeping your files well-organized helps manage multiple sites smoothly. Here's a common folder layout:
/etc/nginx/
├── nginx.conf          ← Main configuration file
├── sites-available/    ← Individual site configs stored here
├── sites-enabled/      ← Symlinks to active site configs

/var/www/
├── site1/              ← site1 root folder
│   └── index.html
└── site2/              ← site2 root folder
    └── index.html

/var/log/nginx/
├── site1.access.log    ← Access log for site1
├── site1.error.log     ← Error log for site1
├── site2.access.log    ← Access log for site2
└── site2.error.log     ← Error log for site2
Each website has its own root folder inside /var/www, while logs are kept in Nginx's default directory /var/log/nginx, with separate files per site for clarity.
Creating the Server Block for site1
Create the configuration for site1 at /etc/nginx/sites-available/site1:
server {
    listen 80;
    server_name site1.com www.site1.com;

    root /var/www/site1;
    index index.html index.htm;

    access_log /var/log/nginx/site1.access.log;
    error_log /var/log/nginx/site1.error.log;

    location / {
        try_files $uri $uri/ =404;
    }
}
Activate the site by linking it to sites-enabled:
sudo ln -s /etc/nginx/sites-available/site1 /etc/nginx/sites-enabled/
Create the site folder and add a test page:
sudo mkdir -p /var/www/site1
echo '<h1>Welcome to Site1</h1>' | sudo tee /var/www/site1/index.html
Creating the Server Block for site2
Next, create the config for site2 at /etc/nginx/sites-available/site2:
server {
    listen 80;
    server_name site2.com www.site2.com;

    root /var/www/site2;
    index index.html index.htm;

    access_log /var/log/nginx/site2.access.log;
    error_log /var/log/nginx/site2.error.log;

    location / {
        try_files $uri $uri/ =404;
    }
}
Enable it:
sudo ln -s /etc/nginx/sites-available/site2 /etc/nginx/sites-enabled/
Create the folder and add a sample page:
sudo mkdir -p /var/www/site2
echo '<h1>Welcome to Site2</h1>' | sudo tee /var/www/site2/index.html
Testing the configuration
Before applying your changes, check your configuration for errors:
sudo nginx -t
If everything checks out, reload Nginx to apply:
sudo systemctl reload nginx
Nginx will now serve both site1.com and site2.com using their own configurations, folders, and log files.
Conclusion
Once you get the hang of Nginx's setup, managing multiple sites on one server becomes straightforward. A clear folder structure, proper firewall rules, and organized logs make your environment easy to maintain and scale over time. This approach works well for personal projects, staging servers, or lightweight production setups.


0 Comments