Arduino IDE


Getting started with RF-Nano and wireless communication

  • avatar
  • 7.4K Views
  • 2 Likes
  • 9 mins read
Preview image

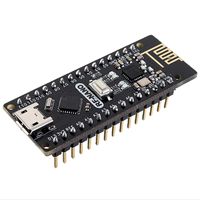
The RF-Nano module is a compact, affordable module that combines an NRF24L01 wireless transceiver with an Arduino-compatible microcontroller. Using the NRF24L01 protocol, the RF-Nano operates on the 2.4 GHz band, making it a practical choice for creating simple, low-power wireless networks. This module is popular among hobbyists and engineers for tasks like home automation, remote control applications, and IoT sensor networks. It’s especially suited for applications where simple, secure data sharing between sensors or remote control devices is required and where a compact, low-cost solution is preferred.

How to use potentiometer with Arduino

  • avatar
  • 7.5K Views
  • 4 Likes
  • 4 mins read
Preview image

A potentiometer is a simple knob that provides a variable resistance, which we can read into the Arduino board as an analog value. They can be attuned from zero ohms to whatever maximum resistance that is specific to it. For example, a potentiometer of 10 kΩ can be adjusted from 0 Ω to its maximum of 10 kΩ.

Interfacing laser diode module with Arduino

  • avatar
  • 6.7K Views
  • 2 Likes
  • 4 mins read
Preview image

Laser modules emit highly focused beams of light, making them ideal for a wide range of applications. One of the key aspects of a laser module is its power output, typically measured in milliwatts (mW). Arduino compatible laser modules typically have a power output within the lower range ensuring safety and compatibility with the microcontroller board. It's important to note that modules require safety precautions due to their increased risk of eye damage and potential fire hazards for higher-power lasers.

 Join Our Monthly Newsletter

Get the latest news and popular articles to your inbox every month

We never send SPAM nor unsolicited emails

DYI - Programmed Christmas lights

  • avatar
  • 6.2K Views
  • 10 mins read
Preview image

Take your holiday decorations to the next level with a custom fairy light display powered by an Arduino Nano. This project blends creativity and basic electronics, allowing you to program fairy lights with unique patterns and effects that reflect your personal style. By replacing generic, store-bought solutions with something custom-made, you’ll create a decoration that’s not only festive but truly one of a kind. With accessible components and straightforward steps, it offers an engaging way to add warmth and charm to your holiday season.

DIY - Remote control car running on Arduino: code

  • avatar
  • 6.1K Views
  • 4 Likes
  • 9 mins read
Preview image

The physical assembly of the car has been completed with all the components properly installed and ready for use. The next steps involve reprogramming the Arduino Nano with the appropriate software to enable all the features, including pairing the car with the AirControl joystick via the NRF24L01 module.

DIY - Remote control car running on Arduino: mounting

  • avatar
  • 5.7K Views
  • 4 Likes
  • 8 mins read
Preview image

With the idea of making a remote-controlled car in mind, we began our investigation by disassembling the frame to uncover its internal components and understand how they work. By gaining a clear understanding of the car's original configuration, we were able to approach the modifications with greater confidence, knowing what changes were necessary and how they would integrate with the existing system.

DIY - Automated plants watering system

  • avatar
  • 5.0K Views
  • 2 Likes
  • 17 mins read
Preview image

In the world of do-it-yourself (DIY) projects, few activities match the practicality of constructing your own Arduino-powered automatic watering system. Imagine a setup where technology integrates effortlessly with nature, allowing you to take control of your plant care routine. We'll break down the fundamental components of this project, highlighting the vital role of the DS1302 timekeeping module and Arduino-compatible pumps. Get ready for a hands-on approach that not only enhances your technical skills but also transforms the way you care for your plants, whether they are in the corners of your home or under the open sky.

Soil moisture sensor with Arduino

  • avatar
  • 4.4K Views
  • 1 Like
  • 9 mins read
Preview image

Soil moisture modules are a simple and friendly way to check how wet your soil is using a pair of probes and a small control board. They offer two outputs you can use with Arduino: an analog signal that changes depending on how wet the soil is, and a digital signal that flips on or off when the moisture crosses a level you set with the onboard potentiometer. The whole setup is compact, cheap and very popular for plant care projects, garden automation and basic hobby experiments.

Connecting a motor to Arduino

  • avatar
  • 5.1K Views
  • 1 Like
  • 7 mins read
Preview image

Arduino microcontrollers are the heart of countless DIY projects, from robots to automated systems. To bring these projects to life, you often need to interface them with motors. In this guide, we'll walk you through the essential steps of connecting a motor to an Arduino using a separate power supply while ensuring control with precision using an NPN transistor. This approach allows you to harness the full potential of your motorized creations without overloading your Arduino.

Controlling a LED with Arduino

  • avatar
  • 5.0K Views
  • 6 mins read
Preview image

Light Emitting Diodes (LEDs) are incredibly adaptable components often employed in electronics projects for various purposes, from indicating status to creating captivating lighting effects. When it comes to managing LEDs with an Arduino, you have the option of utilizing either digital pins or Pulse Width Modulation (PWM) pins. In this article, we'll explore the advantages of each method and provide you with a comprehensive guide on how to control LEDs using an Arduino.