joystick


DIY - Universal RC Joystick: code

  • avatar
  • 2.2K Views
  • 2 Likes
  • 10 mins read
Preview post image

The physical part of the controller is finished but what about the brain? Once more, our decision falls on Arduino Nano. It perfectly fits by size providing all the necessary functionality. For programming a Nano board we need a USB to serial interface which can be hooked up to the programing header located on the top side of our controller.

DIY - Universal RC Joystick: mounting

  • avatar
  • 2.1K Views
  • 2 Likes
  • 6 mins read
Preview post image

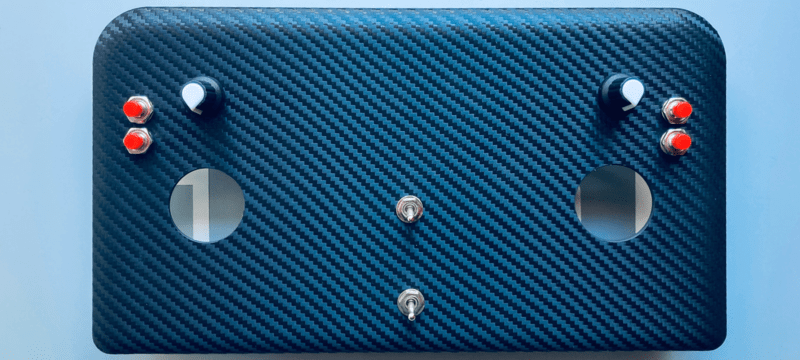
Based on the solution of designing multi-functional remote controller and being aware of the needs we started building the joystick. The cover with controls is ready for use but we miss the most important part: the microcontroller. Once more, our decision falls on Arduino Nano. It perfectly fits by size providing all the necessary functionality.

DIY - Universal RC Joystick: concept

  • avatar
  • 1.7K Views
  • 3 Likes
  • 4 mins read
Preview post image

Controlling devices over a distance opens lots of possibilities. Our Arduino roadmap contains many projects that must be controlled remotely and sometimes on a long-distance. Of course, it can be done with a PC but our experience has shown that it becomes complicated when you need long way, portable and rapid communications. Our solution was designing a multi-functional remote controller, we have called it AirControl.

 Join Our Monthly Newsletter

Get the latest news and popular articles to your inbox every month

We never send SPAM nor unsolicited emails

How to use the AD Keyboard module with Arduino

  • avatar
  • 477 Views
  • 7 mins read
Preview post image

When working on simple Arduino projects that need basic navigation or input, the AD keyboard module is a handy little tool. It's a 5-button unit that behaves like a directional pad, with four arrow-style buttons and one additional button. It doesn't require any soldering or setup, which makes it a practical choice for prototyping or small projects. You can plug it in and start using it right away, thanks to its three-pin layout and built-in resistors.