wiring schema


Controlling fan speed with Arduino using a potentiometer

  • avatar
  • 6.3K Views
  • 5 Likes
  • 5 mins read
Preview image

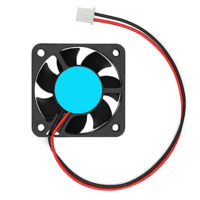
Adjusting a fan's speed using an Arduino is a great way to learn about PWM (Pulse Width Modulation) and motor control. With just a potentiometer and some simple wiring, you can create a smooth, manual speed adjustment system. This setup is useful for cooling electronics, ventilation projects, or any application where adjustable airflow is needed.

DYI - Programmed Christmas lights

  • avatar
  • 6.1K Views
  • 10 mins read
Preview image

Take your holiday decorations to the next level with a custom fairy light display powered by an Arduino Nano. This project blends creativity and basic electronics, allowing you to program fairy lights with unique patterns and effects that reflect your personal style. By replacing generic, store-bought solutions with something custom-made, you’ll create a decoration that’s not only festive but truly one of a kind. With accessible components and straightforward steps, it offers an engaging way to add warmth and charm to your holiday season.

Interfacing laser diode module with Arduino

  • avatar
  • 6.6K Views
  • 2 Likes
  • 4 mins read
Preview image

Laser modules emit highly focused beams of light, making them ideal for a wide range of applications. One of the key aspects of a laser module is its power output, typically measured in milliwatts (mW). Arduino compatible laser modules typically have a power output within the lower range ensuring safety and compatibility with the microcontroller board. It's important to note that modules require safety precautions due to their increased risk of eye damage and potential fire hazards for higher-power lasers.

 Join Our Monthly Newsletter

Get the latest news and popular articles to your inbox every month

We never send SPAM nor unsolicited emails

Connecting a motor to Arduino

  • avatar
  • 5.0K Views
  • 1 Like
  • 7 mins read
Preview image

Arduino microcontrollers are the heart of countless DIY projects, from robots to automated systems. To bring these projects to life, you often need to interface them with motors. In this guide, we'll walk you through the essential steps of connecting a motor to an Arduino using a separate power supply while ensuring control with precision using an NPN transistor. This approach allows you to harness the full potential of your motorized creations without overloading your Arduino.

Practical guide to ESP8266 for TCP servers and clients

Available to registered members only
  • avatar
  • 4.7K Views
  • 3 Likes
  • 17 mins read
Preview image

The ESP8266 module has become a favorite among electronics enthusiasts for its low cost and powerful capabilities. This Wi-Fi module can be used in various ways, making it a versatile tool for many IoT applications. In this guide, we will explore how the ESP8266 can function as both a server and a client using TCP protocol.

Controlling a LED with Arduino

  • avatar
  • 4.9K Views
  • 6 mins read
Preview image

Light Emitting Diodes (LEDs) are incredibly adaptable components often employed in electronics projects for various purposes, from indicating status to creating captivating lighting effects. When it comes to managing LEDs with an Arduino, you have the option of utilizing either digital pins or Pulse Width Modulation (PWM) pins. In this article, we'll explore the advantages of each method and provide you with a comprehensive guide on how to control LEDs using an Arduino.

Understanding SIPO Shift Registers

  • avatar
  • 4.6K Views
  • 1 Like
  • 7 mins read
Preview image

Shift registers are integral components in digital electronics, enabling efficient data management and transfer. When working on Arduino projects, you may quickly run into the issue of not having enough output pins to control all your components. This is where SIPO (Serial-In, Parallel-Out) shift registers come into play. These devices allow you to manage multiple outputs with just a few pins on your Arduino, making them a powerful tool for more complex projects involving numerous LEDs, buttons or other peripherals. This article explores why shift registers are necessary, how they function, and their practical applications with Arduino.

Using touch sensor with Arduino

  • avatar
  • 5.1K Views
  • 4 mins read
Preview image

Touch sensor (also known as touch button) is widely used to control devices. It detects touch, force or pressure on its surface changing the logic state of the circuit. Actually, it works in very similar way as to buttons. Checkout the wiring and Arduino code implementation to track the current state and the state changes.

How to use an analog module with Arduino

  • avatar
  • 5.2K Views
  • 1 Like
  • 4 mins read
Preview image

The KY-023 is an easy-to-use analog joystick. The joystick uses a biaxial potentiometer to control the X and Y axis. It also has an integrated push button. In this tutorial, it is shown how to connect the KY-023 joystick with the Arduino and how to use it.

Using push buttons with Arduino

  • avatar
  • 5.1K Views
  • 2 Likes
  • 4 mins read
Preview image

Today we are going to speak about push buttons, the wiring and how to implement the code for this circuit elements in Arduino. Push buttons connect two points in a circuit when you press them. That means that logic state of the circuit change when you press and keep pressed the button.