Your first Docker Hub image from scratch
Docker provides the ability to package and run an application in a loosely isolated environment called a container. The isolation and security allow you to run many containers simultaneously on a given host. Containers are lightweight and contain everything needed to run the application, so you do not need to rely on what is currently installed on the host. You can easily share containers while you work, and be sure that everyone you share with gets the same container that works in the same way.
A container is a runnable instance of an image. And an image is a read-only template with instructions for creating a Docker container. Often, an image is based on another image, with some additional customization.
Prerequisites
Installed Docker Engine: installing Docker Engine and Docker Compose
An account at Docker Hub, signup here if you don't have one.
Building an image
In order to build an image, we need to use a Dockerfile. It's simply a text-based script of instructions that is used to create a container image. Create an empty file (without extension) with this content:
# Use base image: PHP-FPM, version 7.4.16
FROM php:7.4.16-fpm

# Install basic apt packages
RUN apt-get update && apt-get install -y apt-utils unzip gnupg2 libpng-dev zlib1g-dev

# Download and install composer
RUN curl -sS https://getcomposer.org/installer | php -- --install-dir=/usr/local/bin --filename=composer

# Install & enable bcmath, pcntl, gd PHP extensions
RUN docker-php-ext-install bcmath pcntl gd

# Install PECL extensions and enable them
RUN pecl install xdebug
RUN docker-php-ext-enable xdebug
This Dockerfile will take as base an existing image, which is named PHP and tagged as 7.4.16-fpm (you can find more available tags on the official PHP Docker Hub page). The image will also contain some apt packages, Composer (downloaded and installed) and PECL xdebug extension (installed and enabled).
Next, we must navigate into the folder where the Dockerfile is located and build our image, named php-test (alternatively you can provide the location/folder replacing the dot at the end):
docker build -t php-test-image .
You will see the build progress and it will take a while to complete:
Step 1/6 : FROM php:7.4.16-fpm
...
Step 2/6 : RUN apt-get update && apt-get install -y apt-utils unzip gnupg2 libpng-dev zlib1g-dev
...
Step 3/6 : RUN curl -sS https://getcomposer.org/installer | php -- --install-dir=/usr/local/bin --filename=composer
...
Step 4/6 : RUN docker-php-ext-install bcmath pcntl gd
...
Step 5/6 : RUN pecl install xdebug
...
Step 6/6 : RUN docker-php-ext-enable xdebug
...
Successfully built 49b2ae7702c7
Successfully tagged php-test-image:latest
We've successfully built our first container image.
Managing images
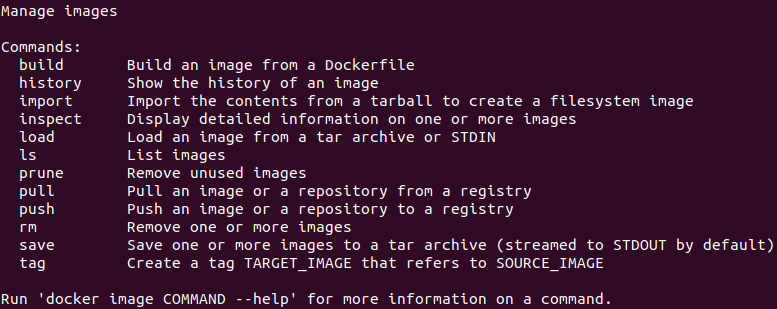
Most commands in docker are clear, descriptive and easy to use. You can find all available commands to manage images with following command:
docker image
And available options are:

Starting a container
Now, once the image is successfully built, let’s run the following command to spin up the container in background mode (-D option):
docker run --name php-test-container php-test-image -D

Once container is started, you can get into a bash shell in the container using the command:
docker exec -it php-test-container bash
Managing containers
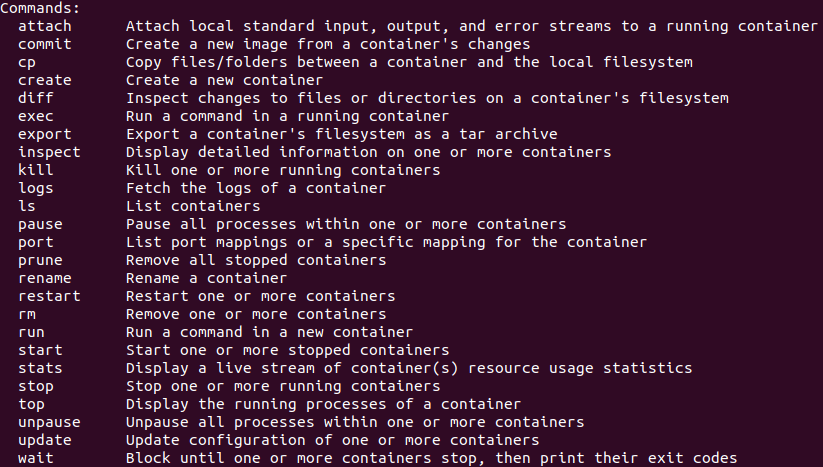
Similar to images, you can find all available commands to manage a container with following command:
docker container
And available options are:

Sharing images with Docker Hub
As we’ve been running images and using them as the basis for our own, we’ve seen Docker download them from Docker Hub. We can upload our own images to Docker Hub for distribution too.
First, we’ll log in to the Docker registry:
docker login --username=my_username
Replace the my_username value with your created username and type your password when it's prompted.
Before uploading the image, we should tag it. The format for Docker tags is username/repository:tag. For our tutorial example, it will be:
docker tag php-test-image my_username/php-test-image:1.0
docker tag php-test-image my_username/php-test-image:latest
Now we can push the image:
docker push my_username/php-test-image:1.0
docker push my_username/php-test-image:latest
Visiting our account area on Docker Hub, we can see the new repository and details about it:

All other users will be able to pull our image and use it to build their own ones.
Conclusion
In this tutorial, we learned the very basics about building a container image and created a Dockerfile to do so. In the same way you can serve MySQL, Nginx, Apache, etc... having independent, isolated and secure containers for each of them.
Credits
Official GitHub: https://github.com/hibit-dev/php-base


0 Comments