What is PWM and how it works
Pulse Width Modulation (PWM) is a technique for getting analog results with digital means. Digital control is used to create a square wave, a signal switched between ON and OFF. If you repeat this on/off pattern fast enough with a LED for example, the result is as if the signal is a steady voltage between 0 and VCC controlling the brightness of the LED.
Duty Cycle
The term duty cycle describes the proportion of ON time to the regular interval or period of time; a low duty cycle corresponds to low power, because the power is OFF for most of the time. Duty cycle is expressed in percent:
100% being fully ON
0% being fully OFF
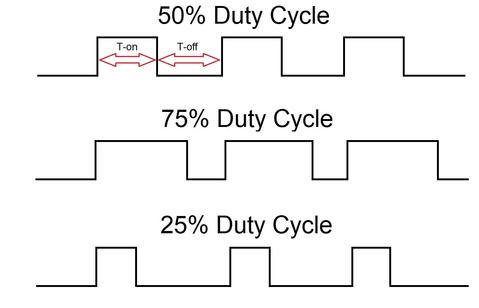
So at 25% duty cycle and 1Hz frequency, a LED will be high for 250 milliseconds and will be low for the other 750 milliseconds. Increasing the frequency we will increase the number of on/off switches (e.g. 50Hz is equivalent to 50 switches per second). For human eye the led will be seen at 25% of the full brightness.
Arduino and PWM
Arduino boards have special PWM pins, to be used as output, listed below:
Arduino Uno: 3, 5, 6, 9, 10, 11 at 490Hz (pins 5 and 6 at 980Hz)
Arduino Nano: 3, 5, 6, 9, 10, 11 at 490Hz (pins 5 and 6 at 980Hz)
Arduino Mini: 3, 5, 6, 9, 10, 11 at 490Hz (pins 5 and 6 at 980Hz)
Arduino Mega: 2 to 13, 44 to 46 at 490Hz (pins 3 and 11 at 980Hz)
Arduino IDE has a built-in function analogWrite(pin, value) which can be used to generate a PWM signal for given pin:
analogWrite(PIN, 255): generate a signal with 100% duty cycle.
analogWrite(PIN, 127): generate a signal with 50% duty cycle.
analogWrite(PIN, 0): generate a signal with 0% duty cycle.
Note: we can provide any value in [0-255] range using this function which maps to [0-100] duty cycle in percents.
Arduino Code
The following code generates a 490Hz and 50% duty cycle signal on PWM pin D6.
#define PWM_PIN 6

void setup()
{
  pinMode(PWM_PIN, OUTPUT);
}

void loop()
{
  analogWrite(PWM_PIN, 127);
}
Credits
Official GitHub: https://github.com/hibit-dev/pwm


0 Comments