Soil moisture sensor with Arduino
Soil moisture modules are a simple and friendly way to check how wet your soil is using a pair of probes and a small control board. They offer two outputs you can use with Arduino: an analog signal that changes depending on how wet the soil is, and a digital signal that flips on or off when the moisture crosses a level you set with the onboard potentiometer. The whole setup is compact, cheap and very popular for plant care projects, garden automation and basic hobby experiments.
This article explains how the modules work internally, how the actual measurement happens in the soil, the two main types of sensors you will find, how to wire them to an Arduino and how to make the readings useful in real projects.
Components
| 1x Arduino Nano (or another Arduino module) $3.39 |
| 1x Mini-breadboard
|
| 1x Moisture sensor
|
| Dupont wires
|


How soil moisture measurement works
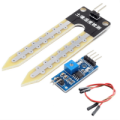
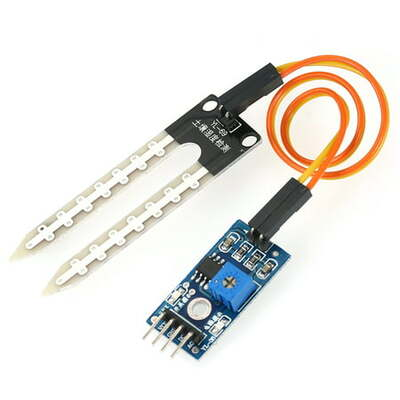
A typical soil moisture module consists of two main parts. The first part is the probe section, often two metal legs placed into the soil. These legs have header pins that connect to the second part, a small board with amplification and signal conditioning. That board then connects to your controller.
When you power the module through its VCC and GND pins, a small voltage is applied across the two probe legs.
In dry soil, the soil shows high resistance, so very little current flows.
In wet soil, the soil becomes more conductive, lowering the resistance and letting more current pass.
The module senses these differences in resistance and converts them into a voltage the microcontroller can read. This is why the analog output changes depending on how much water is present between the probes.
Soil type plays a big role too. Sandy soil, clay rich soil, and potting mixes often give different readings even if they hold similar amounts of water. Water with dissolved minerals or fertilizer can also shift the values. So numbers from your project might not match someone else's setup, and that is completely fine. What matters is that your readings stay consistent for your own environment so you can set good thresholds.
Types of soil moisture sensors
Two common types of soil moisture sensors show up in small projects and hobby kits. Each type measures a different soil property that changes when the soil gets wetter.
Resistive soil moisture sensors
A resistive sensor estimates moisture content using soil resistivity. Water in the soil reduces resistivity significantly, so the sensor's two probes measure the electrical resistance between them. Lower resistance usually means wetter soil. These sensors are simple, cheap and easy to use, which explains their popularity.
 One important note is that the probes slowly corrode if they carry current for long periods. This happens because the metal interacts with moisture, minerals and constant voltage. Powering the probes only when taking a reading helps extend their life.
Capacitive soil moisture sensors
A capacitive sensor uses two plates with space between them. The soil itself becomes the dielectric material between the plates. As water content rises, the soil's dielectric constant increases. This shifts the sensor output in a predictable way.
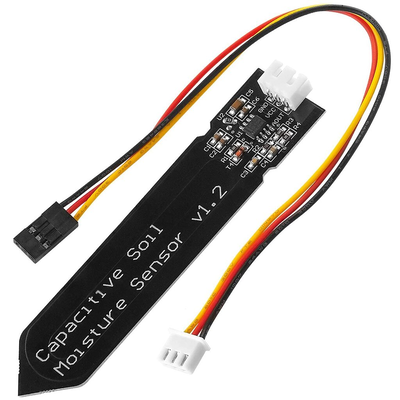 Capacitive sensors usually last longer because they do not pass direct current through metal legs. They also tend to give more stable readings over time.
Wiring schema
The module connections are straightforward and quick to wire. The probe has two metal legs that measure the soil's resistance. These legs end in a small two pin connector that links them to the board. On the other side, you normally get four pins: VCC, GND, A0 and D0.
 Use them as following:
VCC to Arduino 5V
GND to Arduino GND
AO (analog output) to an Arduino analog pin, for example A0
DO (digital output) to an Arduino digital pin, for example D2
The potentiometer on the board adjusts how sensitive the digital output is. Turn it slowly while watching the onboard LED to see when it toggles. This lets you set the moisture point where your Arduino reacts without touching the code.
Probe corrosion
The metal probes slowly corrode with constant power. To slow this down, power the sensor board only when taking a reading. You can turn the VCC line on and off through a transistor controlled by the Arduino. Another long lasting option is to switch to capacitive soil moisture sensors, which do not pass current through the soil and stay stable for a long time.
Calibration
Check the module with dry soil and then with soil at the moisture point you consider healthy. With these two reference points, you can map analog values to a percentage scale that makes sense for your plants. Averaging several readings and adding short delays helps smooth out noise.
Arduino code
Here is an example sketch that reads both the analog and digital signals and prints them. You can use one or both outputs depending on your project.
const int analogPin = A0;
const int digitalPin = 2;

void setup() {
  Serial.begin(9600);
  pinMode(digitalPin, INPUT);
}

void loop() {
  int analogValue = analogRead(analogPin);
  int digitalValue = digitalRead(digitalPin);

  float moisturePercent = (1023.0 - analogValue) / 10.23;

  Serial.print("Analog Raw ");
  Serial.print(analogValue);
  Serial.print("  Moisture ");
  Serial.print(moisturePercent, 1);
  Serial.print("%  Digital ");
  Serial.println(digitalValue);

  delay(1000);
}
This code reads the soil moisture sensor and shows the results on the Serial Monitor. The analog pin gives a detailed reading of how wet the soil is, and the digital pin shows a simple high or low signal based on the threshold set on the sensor.
Inside the main loop, the analog value is read and then converted to a percentage using the map() function. This scales the 0–1023 range from the sensor into 0–100%, with higher values representing wetter soil.
Testing
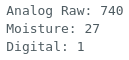
Once your sensor is wired and the code is uploaded, it’s time to check if everything works correctly. Start by opening the Serial Monitor on your Arduino. You should see the analog reading, the mapped moisture percentage, and the digital output updating every second.
When the probe is in dry air or soil, the Serial Monitor shows higher analog readings, a low moisture percentage, and the digital output remains high. The first image illustrates these values clearly.
 Next, placing the probe in water produces a noticeable change. The analog reading decreases, the mapped moisture percentage increases, and the digital output switches to low. The onboard LED on the sensor also turns on, indicating that the moisture threshold has been reached. The second image shows these values on the Serial Monitor when the probe is in water.
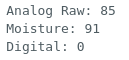 Some modules produce higher values when the soil is wet, others produce lower values. Test your module by checking readings in dry air and then in water so you know how your specific model behaves.
Conclusion
Soil moisture modules offer a friendly mix of simplicity and usefulness. With clear wiring, basic calibration and a bit of sensor care you can build plant monitors, irrigation helpers or environmental control systems that run smoothly. Focus on consistent readings in your own setup and let those guide your automation steps.
Credits
Official GitHub: https://github.com/hibit-dev/moisture-sensor


0 Comments