Integrating membrane keypad with Arduino
In the world of DIY electronics, Arduino stands as a go-to tool for creators and hobbyists. Today, we're exploring the integration of a 4x4 membrane keypad module with an Arduino, a combination that introduces an interactive layer to your electronic projects.
Components
| 1x Arduino Nano (or another Arduino module) $3.39 |
| 1x Mini-breadboard
|
| 1x Keypad module
|
| Dupont wires
|
| Keypad library |


Wiring schema
The 4x4 keypad module is essentially a compact grid of 16 buttons, arranged in four rows and four columns. Each button press completes a circuit, sending a unique signal combo based on its row (R1, R2, R3, R4) and column (C1, C2, C3, C4).
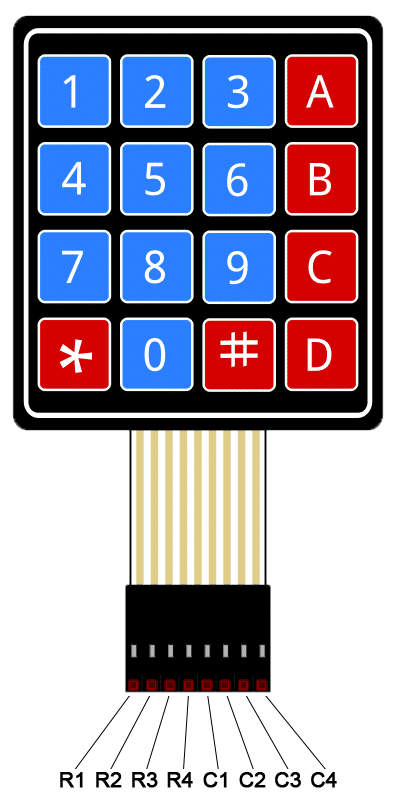
By linking the keypad's rows and columns to the digital pins on the Arduino, you can interpret these signals. Connecting this keypad to Arduino is a simple procedure. Start by using jumper wires to link the keypad to the Arduino board.
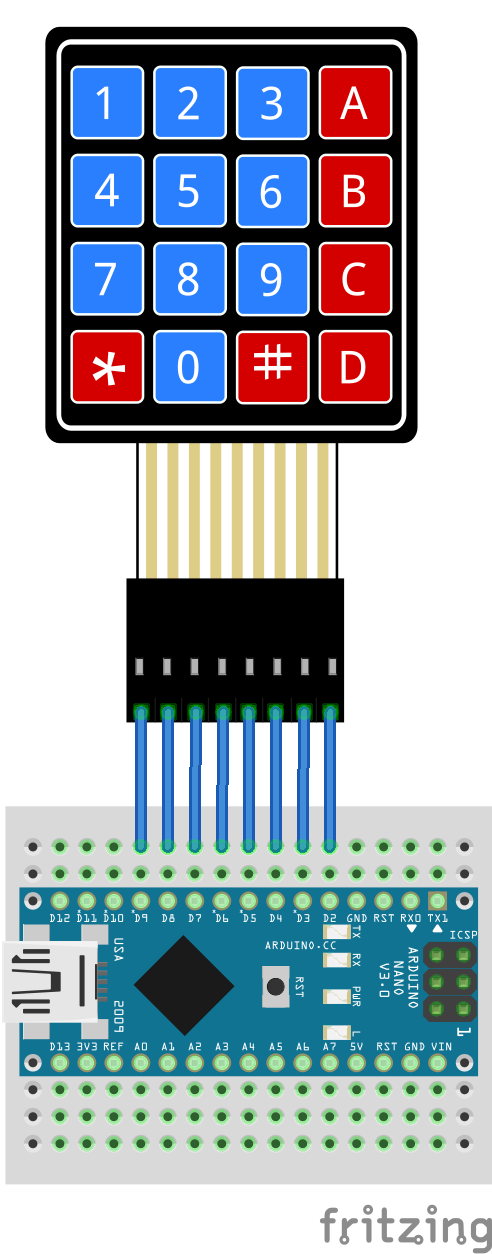
Once connected, you can employ the Arduino IDE to upload the sample code.
Installing library for keypad
To interact with the keypad, we will use an existing library. This library, provides an interface that facilitates communication with the module, saving you significant time and providing a reliable and extensively tested code base. It can be downloaded from our official repository.
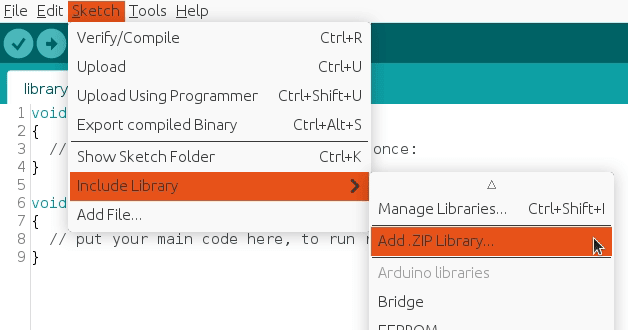
To import a library, open the Arduino IDE, go to Sketch > Include Library > Add .ZIP Library and select the library file downloaded from our GitHub repository.
Then you can simply use include statement:
#include "Keypad.h"
It will include the library with predefined functions to interact with the module.
Arduino code
This code will enable your Arduino to recognize the keys pressed on the 4x4 keypad, allowing you to easily integrate user input into your projects.
#include "Keypad.h"

const int COLS = 4; // Amount of columns on the keypad
const int ROWS = 4; // Amount of rows on the keypad

char keys[ROWS][COLS] = {
  {'1', '2', '3', 'A'},
  {'4', '5', '6', 'B'},
  {'7', '8', '9', 'C'},
  {'*', '0', '#', 'D'}
};

byte PINS_ROW[ROWS] = {9, 8, 7, 6}; // Pins on Arduino corresponding to R1, R2, R3, R4
byte PINS_COL[COLS] = {5, 4, 3, 2}; // Pins on Arduino corresponding to C1, C2, C3, C4

Keypad MyKeypad = Keypad(makeKeymap(keys), PINS_ROW, PINS_COL, ROWS, COLS);

void setup()
{
  Serial.begin(115200);
}

void loop()
{
  char key = MyKeypad.getKey(); // Read the key

  // Check if some key is pressed
  if (key) {
    Serial.print("Key Pressed : ");
    Serial.println(key);
  }
}
Adapting the code to a different keypad version, such as a 3x4 membrane keypad, is straightforward.
#include "Keypad.h"

const int COLS = 3; // Amount of columns on the keypad
const int ROWS = 4; // Amount of rows on the keypad

char keys[ROWS][COLS] = {
  {'1', '2', '3'},
  {'4', '5', '6'},
  {'7', '8', '9'},
  {'*', '0', '#'}
};

byte PINS_ROW[ROWS] = {9, 8, 7, 6}; // Pins on Arduino corresponding to R1, R2, R3, R4
byte PINS_COL[COLS] = {5, 4, 3}; // Pins on Arduino corresponding to C1, C2, C3

Keypad MyKeypad = Keypad(makeKeymap(keys), PINS_ROW, PINS_COL, ROWS, COLS);

void setup()
{
  Serial.begin(115200);
}

void loop()
{
  char key = MyKeypad.getKey(); // Read the key

  // Check if some key is pressed
  if (key) {
    Serial.print("Key Pressed : ");
    Serial.println(key);
  }
}
Testing
Once you've loaded the sketch, launch your serial monitor at 115200 baud. Now, input some keys on the keypad; the serial monitor should show the corresponding key values.

Conclusion
In the world of Arduino modules, the keypad module emerges as a reliable and accessible input solution. Moving from educational projects to prototyping and beyond, the module's straightforward design stands out as its primary asset, making it a practical choice for different electronic projects.
Credits
Official GitHub: https://github.com/hibit-dev/keypad
Official keypad library: https://playground.arduino.cc/Code/Keypad/


0 Comments