GitLab OAuth2.0 access for web application
GitLab is one of fastest growing private software companies. The company provides a central server that manages git repositories and is used to simplify the administration tasks of many corporations worldwide. Their platform allows third party websites to use GitLab as registration or login option with just a few clicks. That is the social login and it allows customers to bring their existing social identities and use them to register and log in without creating a new account explicitly. It saves a lot of time for users and makes the life easier as we don't need to remember all those credentials for different websites anymore.
Prerequisites
GitLab can be popular sign in option but it's still an option. There are many alternatives and all of them can work together. We recommend you to read about OAuth 2.0 protocol and how it works. We have a detailed post about it here: understanding OAuth 2.0 and how it works.
You will need a GitLab account to generate a client id and a client secret. If you don't have an account, create one from here: GitLab SignUp.
Configuring GitLab APP
First, you must login to your existing or recently created account. Open the drop down menu available clicking your avatar on the top right corner and navigate to preferences page. There will be another menu on the left sidebar: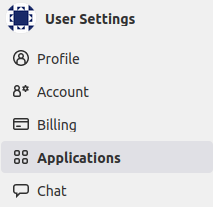
Click on Applications link to setup your application. There will be a simple form to fill indicating your application name and some details about it.
Credentials and permissions
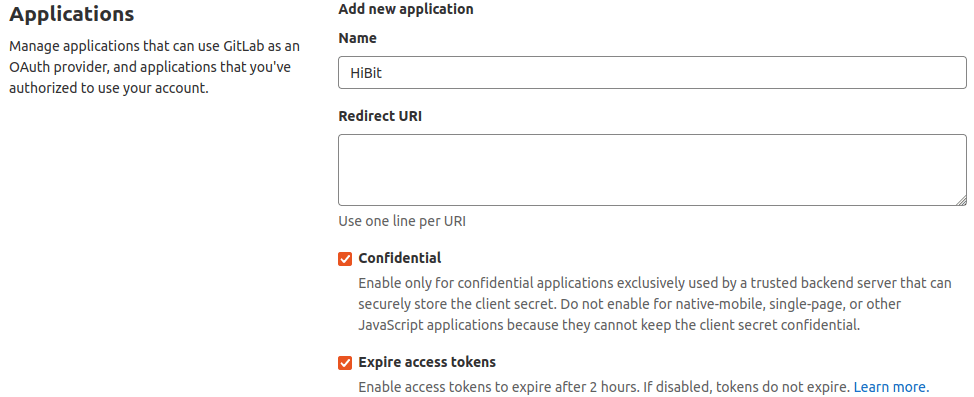
The form to register your application is simple and only requires a name and redirect URI (i.e. callback URL).
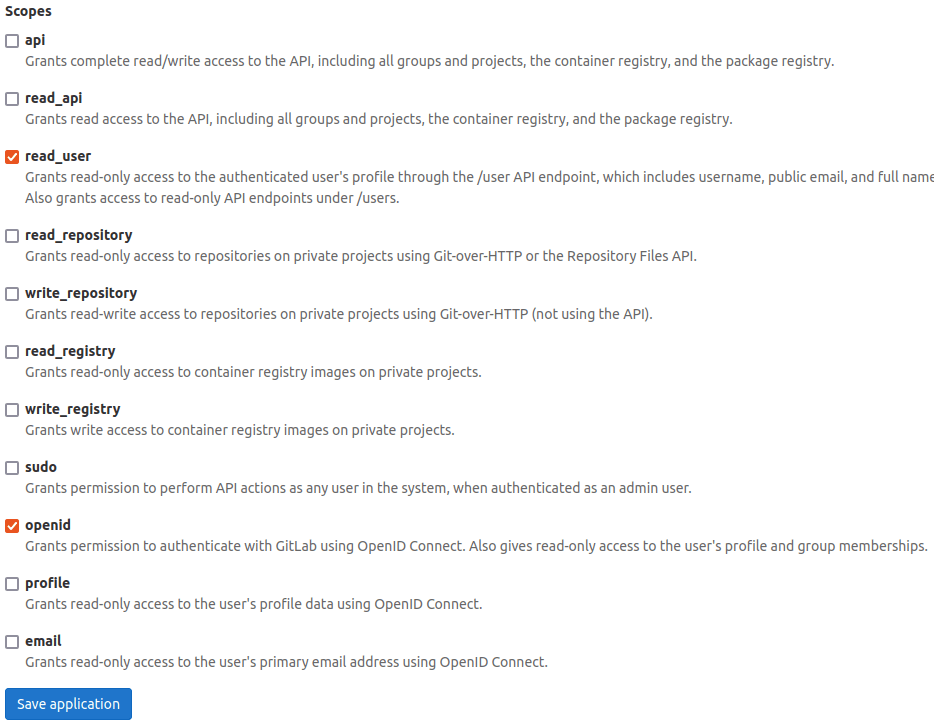
Next to the application form you will find scopes list. Select the granted permissions for your application. For registration and login purposes open ID and user read are enough:
Save the form to generate your application together with a client ID (application ID) and client secret (secret):
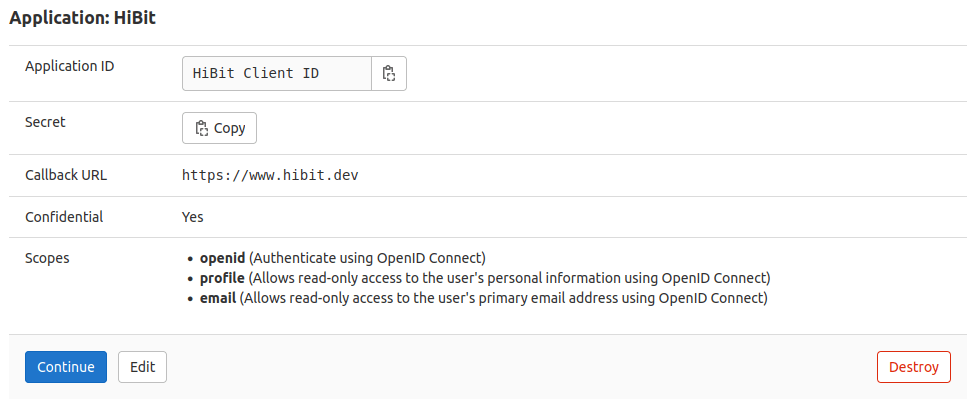
Save your credentials in a secure place and click continue to finish the process.
Configuring your application
The web application flow to authorize users for your app is:
Users are redirected to request their GitLab identity
Users are redirected back to your site by GitLab
Your app accesses the API with the user's access token
Request a user's GitLab identity
Your first step is to create the authorization request. That request sets parameters that identify your application and define the permissions that the user will be asked to grant to your application.
GitLab's OAuth 2.0 endpoint is at:
http://gitlab.com/oauth/authorize
The GitLab authorization server supports the following query string parameters:
Name | Type | Description |
client_id | Required | The client ID you received from GitLab when you registered your application. |
redirect_uri | Required | The URL that you want to redirect the person logging in back to. The value must exactly match one of the authorized redirect URIs for the OAuth 2.0 client, which you configured in your when you registered your application. |
response_type | Required | Determines whether the BitBucket OAuth 2.0 endpoint returns an authorization code. |
scope | Required | A comma or space separated list of Permissions to request from the person using your app. |
code_verifier | Recommended | Random string, between 43 and 128 characters in length |
code_challenge | Recommended | URL-safe base64-encoded string of the SHA256 hash of the code_verifier. |
state | Recommended | A string value created by your app to maintain state between the request and callback. This parameter should be used for preventing Cross-site Request Forgery and will be passed back to you, unchanged, in your redirect URI. |
Users are redirected back to your site by GitLab
If the user accepts your request, GitLab redirects back to your site with a temporary code in a code parameter as well as the state you provided in the previous step in a state parameter. Exchange this code for an access token making a POST request to the URL below:
https://gitlab.com/oauth/token
and set the following parameters:
Name | Description |
client_id | The client ID you received from GitLab for your OAuth App. |
client_secret | The client secret you received from GitLab for your OAuth App. |
code | The code you received as a response from the initial request. |
grant_type | As defined in the OAuth 2.0 specification, this field's value must be set to authorization_code. |
redirect_uri | The URL in your application where users are sent after authorization. |
code_verifier | Random string, between 43 and 128 characters in length |
By default, the response takes the following form:
Name | Description |
access_token | The token that your application sends to authorize a GitHub API request. |
token_type | The type of token returned. At this time, this field's value is always set to Bearer. |
expires_in | The remaining lifetime of the access token in seconds. |
refresh_token | A token that you can use to obtain a new access token. Refresh tokens are valid until the user revokes access. |
Use the access token to access the API
The access token allows you to make requests to the API on a behalf of a user. Use the following endpoint:
https://gitlab.com/api/v4/user
Providing the access token generated in the previous step with one of the following methods:
Send it in the request Authorization header:
Authorization: Bearer <access_token>
Include it in the POST body:
?access_token=<access_token>
Depending of the selected scope you will have more or less information about the user.
Conclusion
We've described and learned how the complete OAuth 2.0 flow works with GitLab. It's easy and quite forward. You can have your application within minutes and test GitLab responses yourself.


0 Comments