Getting started with Arduino Uno
Arduino is an open-source electronics platform based on easy-to-use hardware and software. Arduino boards are able to read inputs - light on a sensor, a finger on a button, or a Twitter message - and turn it into an output - activating a motor, turning on an LED, publishing something online. You can tell your board what to do by sending a set of instructions to the microcontroller on the board. To do so you use the Arduino programming language and the Arduino Software (IDE).
Over the years Arduino has been the brain of thousands of projects, from everyday objects to complex scientific instruments. A worldwide community of makers - students, hobbyists, artists, programmers, and professionals - has gathered around this open-source platform, their contributions have added up to an incredible amount of accessible knowledge that can be of great help to novices and experts alike.
Components
| 1x Arduino Uno (or compatible Arduino module) $3.76 |
| Arduino IDE |


Arduino Uno specification
Microcontroller | ATmega328P |
|---|---|
Operating Voltage | 5V |
Flash Memory | 32 KB (ATmega328P) of which 0.5 KB used by bootloader |
SRAM | 2KB |
Clock Speed | 16MHz |
Analog IN Pins | 6 |
EEPROM | 1KB |
DC Current | 20mA (I/O Pins) |
Input Voltage | 7-12V |
Digital I/O Pins | 14 (of which 6 provide PWM output) |
PCB Size | 69x54mm |
Weight | 25g |
Arduino Uno pinout
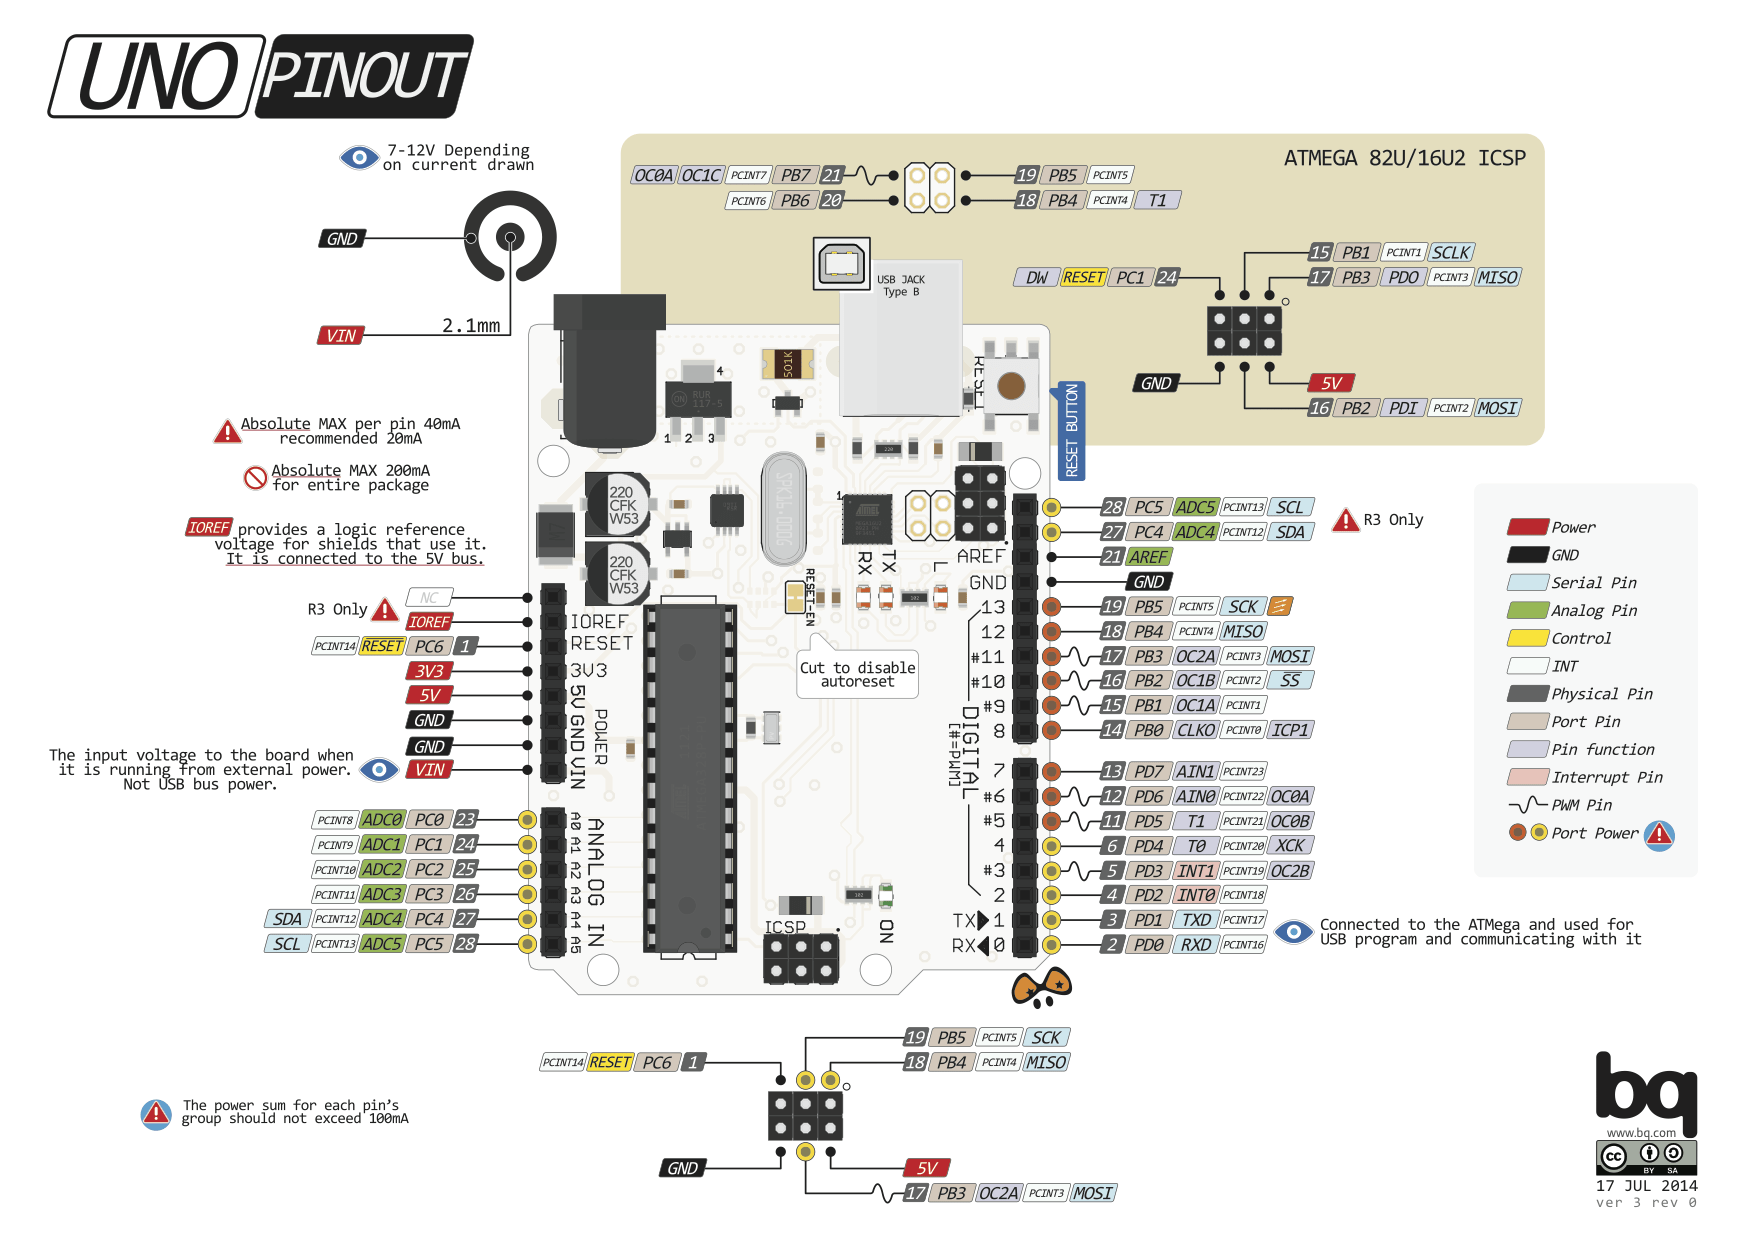
Each of the 14 digital pins on the Uno can be used as an input or output, using pinMode(), digitalWrite(), and digitalRead() functions. They operate at 5 volts. Each pin can provide or receive 20 mA as recommended operating condition and has an internal pull-up resistor (disconnected by default) of 20-50 k ohm. A maximum of 40mA is the value that must not be exceeded to avoid permanent damage to the microcontroller.
The board can operate on an external supply of 6 to 20 volts. If supplied with less than 7V, however, the 5V pin may supply less than five volts and the board may become unstable. If using more than 12V, the voltage regulator may overheat and damage the board. The recommended range is 7 to 12 volts.
In addition, some pins have specialized functions:
Serial: 0 (RX) and 1 (TX). Used to receive (RX) and transmit (TX) TTL serial data.
External Interrupts: 2 and 3. These pins can be configured to trigger an interrupt on a low value, a rising or falling edge, or a change in value. See the attachInterrupt() function for details.
PWM: 3, 5, 6, 9, 10, and 11. Provide 8-bit PWM output with the analogWrite() function.
SPI: 10 (SS), 11 (MOSI), 12 (MISO), 13 (SCK). These pins support SPI communication.
TWI: A4 (SDA) and A5 (SCL). Support TWI communication using the Wire library.
LED: 13. There is a built-in LED connected to digital pin 13. When the pin is HIGH value, the LED is on, when the pin is LOW, it's off.
The Uno has 6 analog inputs, each of which provide 10 bits of resolution (i.e. 1024 different values). By default they measure from ground to 5 volts, though is it possible to change the upper end of their range using the analogReference() function.
There are a couple of other pins on the board:
AREF. Reference voltage for the analog inputs. Used with analogReference().
Reset. Bring this line LOW to reset the microcontroller.
Arduino IDE
The open-source Arduino Software (IDE) allows you to write programs and upload them to your board. This software can be used with any Arduino board and it's compatible with most operating systems. It is available for downloading on the official Arduino website.
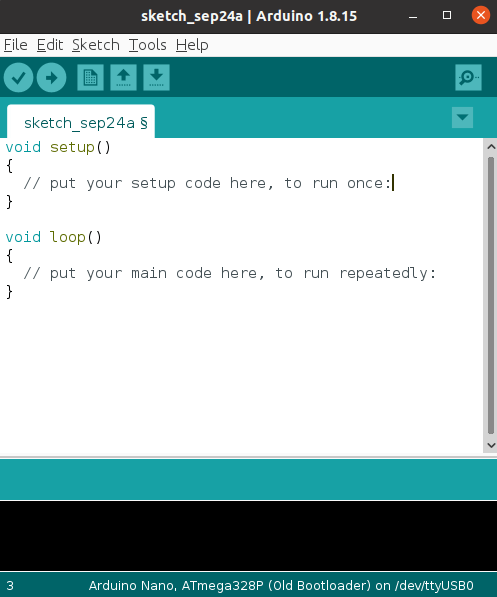
As you can see, the interface is very simple and easy to use. The most used buttons are available on the top (from left to right):
Verify: verify your sketch for errors and try to compile it
Upload: verify, compile and upload the sketch to the Arduino board
New: create a new sketch
Open: open already existing sketch
Save: save open sketch
Serial Monitor: I/O interface to communicate with the board
Arduino sketch
A sketch is a program written with the Arduino IDE. Sketches are saved on the development computer as text files with the file extension .ino.
A minimal Arduino C/C++ program consists of only two functions:
setup(): This function is called once when a sketch starts after power-up or reset. It is used to initialize variables, input and output pin modes, and other libraries needed in the sketch.
loop(): After setup() function exits/ends, the loop() function is executed repeatedly in the main program. It controls the board until the board is powered off or is reset.
Conclusion
Thanks to its simple and accessible user experience, Arduino has been used in thousands of different projects and applications. The Arduino software is easy-to-use for beginners, yet flexible enough for advanced users. It runs on Mac, Windows and Linux. Feel free to choose the board that better fits your project needs.


0 Comments