How to control servo motor with Arduino
A servo motor is a type of motor that is designed to provide precise control of position and speed. It is a rotary actuator that can rotate to a specified angle with a high degree of accuracy. Servo motors are commonly used in a wide variety of applications, including robotics, factory automation, camera stabilization systems, and remote-controlled vehicles, to name a few.
The key feature of a servo motor is its ability to maintain a particular position, even under load or when external forces are applied. This is accomplished through the use of a closed-loop control system that includes a feedback mechanism which provides information about the motor's actual position. The feedback signal is compared to the desired position, and the servo motor adjusts its output accordingly to maintain the desired position.
Prerequisites
We strongly recommend reading our article about PWM: What is PWM and how it works.
Components
| 1x Arduino Nano (or another Arduino module) $3.39 |
| 1x Mini Breadboard
|
| 1x Micro Servo SG90 $4.14 |
| 1x Micro Servo MG90S (metal gear) $5.84 |
| Dupont wires
|


Servo motors: SG90 vs MG90S
Servo motors come in a range of sizes and shapes, from small motors that can fit in the palm of your hand to larger motors that can power industrial machinery. They are typically more expensive than other types of motors, such as stepper motors or DC motors. The SG90 and MG90S are two popular models of servo motors that have some key differences in their specifications and performance.
The SG90 is a smaller and less powerful servo motor compared to the MG90S. The SG90 has a torque of around 1.8 kg-cm, while the MG90S has a torque of around 2.2 kg-cm. This means that the MG90S can handle slightly higher loads than the SG90. Additionally, the MG90S has a metal gear train, while the SG90 has a plastic gear train. The metal gear train makes the MG90S more durable and able to handle higher loads than the SG90, which may be prone to wear and tear over time.
Finally, the SG90 has a slightly slower response time compared to the MG90S. The SG90 has a response time of around 0.12 seconds, while the MG90S has a response time of around 0.08 seconds. This means that the MG90S is more responsive to changes in position or speed, making it better suited for applications where fast and precise control is necessary.
The choice between the two will depend on the specific requirements of the application.
Wiring schema
The connection between Servo motors and Arduino Nano is straightforward. The servo motor's position can be controlled by sending a pulse signal to the servo motor's control line. The length of the pulse determines the position of the servo motor.
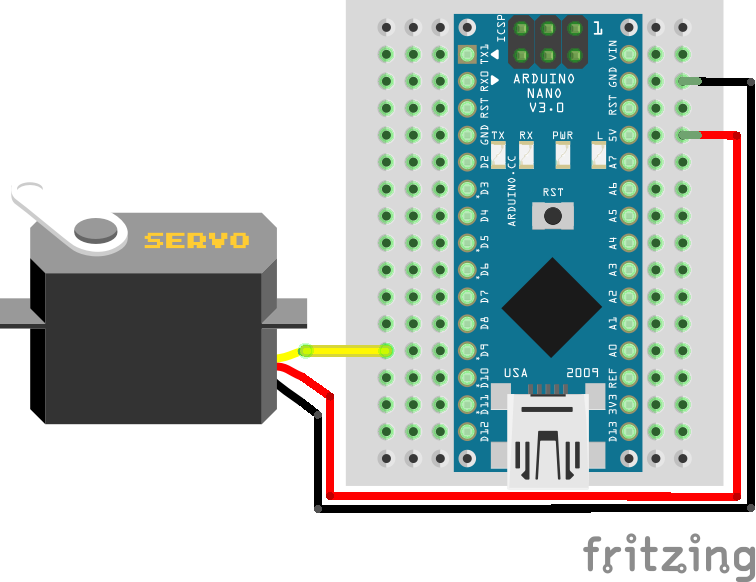
To connect a servo motor to Arduino Nano, the servo motor's control line is connected to one of the PWM enabled digital pins on the Arduino Nano. The servo motor's power and ground are also connected to the power and ground pins on the Arduino Nano, respectively.
Servo motor | Arduino |
|---|---|
Power (red) | 5V |
Ground (brown or black) | GND |
Signal (orange, yellow or white) | Pin D9 |
Once the servo motor is connected, the Arduino Nano can send pulse signals to the servo motor to control its position. A servo motor is controlled by sending a series of pulses through the signal line. The width of the pulse is what determines the angular position of the servo, which can typically rotate up to 180 degrees, as it has physical limits. Generally pulses with 1ms duration correspond to 0 degrees position, 1.5ms duration to 90 degrees and 2ms to 180 degrees.
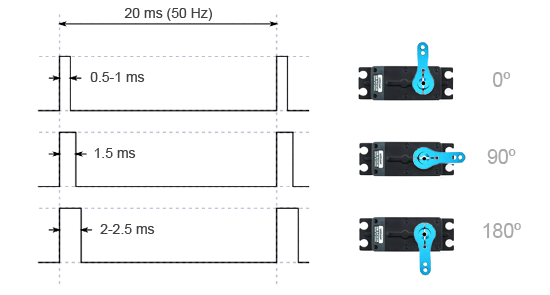
While the duration of the pulses required to control a servo motor is typically standardized, the minimum and maximum pulse durations may vary depending on the specific brand or model of the servo motor being used.
Arduino code
We can control the servo motor by utilizing the Servo.h library, which is already included in the Arduino IDE upon installation. The following code will turn a servo motor to 180 degrees, wait 1 second, then turn it to 0, wait one more second and then repeat the process.
#include "Servo.h"

#define SERVO1_PIN 9

#define MIN_ANGLE 0
#define MAX_ANGLE 180

#define DEFAULT_ANGLE 90

int servoAngle = DEFAULT_ANGLE;

Servo Servo1;

void setup()
{
  Servo1.attach(SERVO1_PIN);
  Servo1.write(DEFAULT_ANGLE);
}

void loop()
{
  // goes up to 180 degrees
  graduallyApplyServoAngle(MAX_ANGLE);
  delay(1000);

  // return to 0 degrees
  graduallyApplyServoAngle(MIN_ANGLE);
  delay(1000);
}

void graduallyApplyServoAngle(int angle)
{
  int limitedAngle = limitServoAngle(angle);

  while (servoAngle != limitedAngle) {
    if (servoAngle > limitedAngle) {
      servoAngle--;
    }

    if (servoAngle < limitedAngle) {
      servoAngle++;
    }

    Servo1.write(servoAngle);

    delay(5);
  }
}

int limitServoAngle(int angle)
{
  return constrain(angle, MIN_ANGLE, MAX_ANGLE);
}
Controlling the exact pulse
For achieving more precise control over the servo motor, we can transmit the specific duration of microseconds directly to the motor. By specifying the duration of the pulse in microseconds, we can fine-tune the servo motor's position to a high degree of accuracy, allowing for more nuanced movements and greater precision.
#include "Servo.h"

#define SERVO1_PIN 9

#define MIN_MS 0
#define MAX_MS 2000

#define DEFAULT_MS 1000 //90 degrees

int servoPulse = DEFAULT_MS;

Servo Servo1;

void setup()
{
  Servo1.attach(SERVO1_PIN);
  Servo1.writeMicroseconds(DEFAULT_MS);
}

void loop()
{
  // goes up to 180 degrees
  graduallyApplyServoPulse(MAX_MS);
  delay(1000);

  // return to 0 degrees
  graduallyApplyServoPulse(MIN_MS);
  delay(1000);
}

void graduallyApplyServoPulse(int pulse)
{
  int limitedPulse = limitServoPulse(pulse);

  while (servoPulse != limitedPulse) {
    if (servoPulse > limitedPulse) {
      servoPulse--;
    }

    if (servoPulse < limitedPulse) {
      servoPulse++;
    }

    Servo1.writeMicroseconds(servoPulse);
  }
}

int limitServoPulse(int pulse)
{
  return constrain(pulse, MIN_MS, MAX_MS);
}
As previously mentioned, the position of the output shaft of the servo motor is determined by the width of the electrical pulse sent through the control wire. Typically, a pulse width of around 1 millisecond corresponds to the minimum position, 2 milliseconds to the maximum position, and 1.5 milliseconds to the neutral position at 90 degrees. However, these values may vary slightly between different brands and models of servo motors.
Therefore, it is necessary to adjust the minimum and maximum values in the code to match the specifications of the servo motor being used. This can be achieved by testing and tweaking the values until the servo moves to the desired position accurately. Fine-tuning the values in this way ensures that the servo motor can operate correctly and allows for more precise control over its movements.
Conclusion
In conclusion, the connection between Servo motors and Arduino Nano is straightforward and offers many advantages for robotics and automation applications. The precise control of position and speed provided by servo motors, combined with Arduino Nano's small size and low power consumption, make this combination a popular choice for many projects.
Credits
Official GitHub: https://github.com/hibit-dev/servo


0 Comments