Containerizing Symfony Application using Docker
Containerization has become widely adopted in contemporary web development as a means of bundling applications, offering isolated environments, and streamlining deployment procedures. Docker, an open-source platform, has gained substantial popularity by enabling developers to package their applications and dependencies into containers. In this article, we will explore the benefits and steps involved in Docker containerization of Symfony applications, a popular PHP framework.
Prerequisites
In this tutorial, we will guide you through all the necessary steps to create a functional Docker environment. However, for a more in-depth understanding and detailed insights, we highly recommend referring to the following articles:
Installing Docker: Installing Docker Engine and Docker Compose
Docker images basics: Your first Docker Hub image from scratch
Docker containers basics: Docker compose introduction
Understand NGINX: Install and configure Nginx
Symfony setup: How to create Symfony project
Why use Docker containers?
Before we explore Docker containers, it is important to understand the benefits it offers. Docker provides several advantages that significantly enhance the development and deployment workflow of Symfony applications. Here are some key benefits to consider:
Consistent Development Environment: Docker allows developers to establish a standardized and consistent environment across various machines. By encapsulating the Symfony application and its dependencies within a Docker container, developers can eliminate the works on my machine problem. This ensures smooth collaboration and reduces configuration issues.
Portability and Scalability: Docker containers are highly portable, meaning they can be run on any machine or cloud platform that supports Docker. This portability allows developers to easily move their Symfony applications between development, testing, and production environments. Additionally, Docker's scalability features enable effortless scaling of application instances to accommodate varying workloads.
Dependency Management: Symfony applications often rely on specific versions of PHP extensions, libraries, and tools. Docker's containerization approach simplifies dependency management by allowing developers to specify the required versions. This ensures consistent environments throughout various stages of the application's lifecycle.
Getting Started with Dockerizing Symfony
To containerize and execute Symfony applications, it is essential to have a web server with PHP. For the web server component, we will use Nginx. As a result, we will configure PHP-FPM (FastCGI Process Manager) to handle the Symfony code within the Nginx server.
Building PHP-FPM Docker image
Our goal is to have the application running on PHP 8.1 and include the Composer dependency manager within the PHP container. To accomplish this, we will build a simple PHP base image including Composer and other necessary components/extensions for our application.
To create this image, we will use a Dockerfile. A Dockerfile is a text-based script that contains instructions for building a container image. Begin by creating an empty file (without an extension) and populate it with the following content:
# Use base image: PHP-FPM, version 8.1.19
FROM php:8.1.19-fpm

# Install basic apt packages
RUN apt-get update && apt-get install -y apt-utils unzip gnupg2 libpng-dev zlib1g-dev

# Download and install composer
RUN curl -sS https://getcomposer.org/installer | php -- --install-dir=/usr/local/bin --filename=composer

# Install & enable PHP extensions
RUN docker-php-ext-install pcntl gd
This Dockerfile will build over an existing image named PHP with the tag 8.1.19-fpm (additional tags can be found on the official PHP Docker Hub page). This base image will already include essential apt packages. In addition, the Dockerfile will download and install Composer, as well as install and enable extensions to enhance the image's functionality.
After ensuring that we are in the directory where the Dockerfile is located, we can proceed to build our image. We will name the image php-base (alternatively, you can specify the location or folder by replacing the dot at the end with the appropriate path):
docker build -t php-base .
You will see the build progress and it will take a while to complete:

We've successfully built our PHP base image on the local machine.
Sharing images using Docker Hub
Docker Hub simplifies the process of accessing images from its repository to use them or build over them. Additionally, it provides the option to upload your own images, enabling their distribution.
First, we’ll log in to the Docker registry:
docker login --username=my_username
Replace my_username with the username you have created, and enter your password when prompted.
Before uploading the image, it is important to tag it. Docker syntax for tags has the following format:
docker tag image username/repository:tag
For the image we have create, the tag will be:
docker tag php-base hibitdev/php-base:1.0-fpm
Now that the image is tagged, we can push it to Docker Hub:
docker push hibitdev/php-base:1.0-fpm

Visiting our account on Docker Hub, we can see the new repository and details about it:

This implies that our image is publicly available on Docker Hub, allowing other users to easily pull and use it for their own purposes:
docker pull hibitdev/php-base
Configuring application containers
As previously mentioned, running a Symfony application in Docker requires a minimum of two containers: Nginx and PHP-FPM. Docker Compose is a powerful tool designed for managing multi-container Docker applications. It allows you to define and configure your application's services using a YAML file. With a simple command, Docker Compose can create and launch all the specified services based on your configuration.
Create a new YAML file called docker-compose.yml with the following configuration:
services:
  nginx:
    image: nginx:1.24.0
    container_name: hibit_nginx
    ports:
      - "80:80"
    volumes:
      - ./nginx/default.conf:/etc/nginx/conf.d/default.conf
      - ./app:/var/www
    working_dir: /var/www
    links:
      - php-fpm

  php-fpm:
    image: hibitdev/php-base:1.0-fpm
    container_name: hibit_php
    volumes:
      - ./app:/var/www
    working_dir: /var/www
For the NGINX service, we use the official NGINX image (v1.24.0). The container will be named hibit_nginx. Port forwarding will be set up exclusively for standard connections without SSL. Additionally, two volume are defined to include the project code, which should be located within the app directory, and the NGINX configuration. The working directory within the container is set to /var/www, and a link with the PHP service is established.
For the PHP service, we will be using our custom base image created in the previous step. The container will be named hibit_php. A single volume is defined to include the project code, which should be located within the app directory. The working directory within the container is set to /var/www.
Note: all the necessary files and configurations discussed in this article are available on our official GitHub repository.
Running application containers
Once our configuration file is ready, we can start Docker Compose from the same directory. The following command initiates the build and run processes, which can also be executed independently if needed:
docker-compose up -d
After the first time, we can simply use start to turn the services on:
docker-compose start -d
Note: the -d flag starts the container in detached mode.

At this point, you can visit localhost in your browser to access your Symfony project.

To make a change to the filesystem inside some container, you’d take its ID (or the name) and use docker exec to start a shell inside the container:
docker exec -ti [CONTAINER_ID|CONTAINER_NAME] bash
Note: the flag -t opens up a terminal and the -i makes it interactive.
Replace the CONTAINER_ID or CONTAINER_NAME with the corresponding value. In the example below, we access the PHP container and check the version we have installed inside:
docker exec -ti hibit_php bash

To stop the active services preserving containers, volumes and networks, along with every modification made to them we must use the stop command:
docker-compose stop
In the case you want to discard the changes and destroy everything, run:
docker-compose down
Versioning update
We've performed an update on the base image, integrating the most recent PHP version. To enhance clarity, we've also adjusted the version numbering to align with the included PHP version in the package.
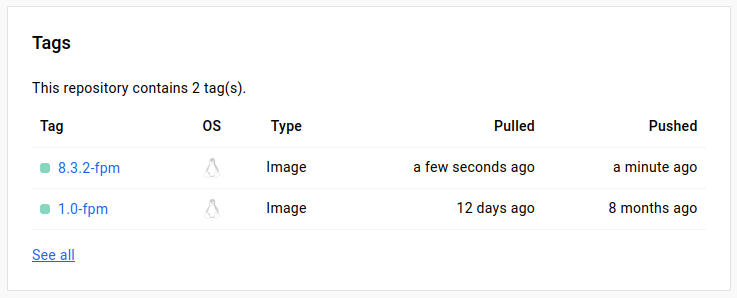
This implies that the semantic versioning for the PHP base image will mirror the semantic versioning of PHP releases.
Conclusion
Docker containerization offers a robust solution for efficiently and portably running Symfony applications. It enables us to bundle our application and its dependencies into self-contained units, simplifying deployment across various environments. Docker Compose allows to define and manage multi-container applications, enabling effortless orchestration of complex setups.
Credits
Official GitHub: https://github.com/hibit-dev/php-containerization
Official DockerHub: https://hub.docker.com/r/hibitdev/php-base


0 Comments