Controlling a LED with Arduino
Light Emitting Diodes (LEDs) are incredibly adaptable components often employed in electronics projects for various purposes, from indicating status to creating captivating lighting effects. When it comes to managing LEDs with an Arduino, you have the option of utilizing either digital pins or Pulse Width Modulation (PWM) pins. In this article, we'll explore the advantages of each method and provide you with a comprehensive guide on how to control LEDs using an Arduino.
Prerequisites
We strongly recommend reading our article about PWM: What is PWM and how it works
Components
| 1x Arduino Nano (or another Arduino module)
|
| 1x Mini-breadboard
|
| LED
|
| 220 ohm resistor
|
| Dupont wires
|


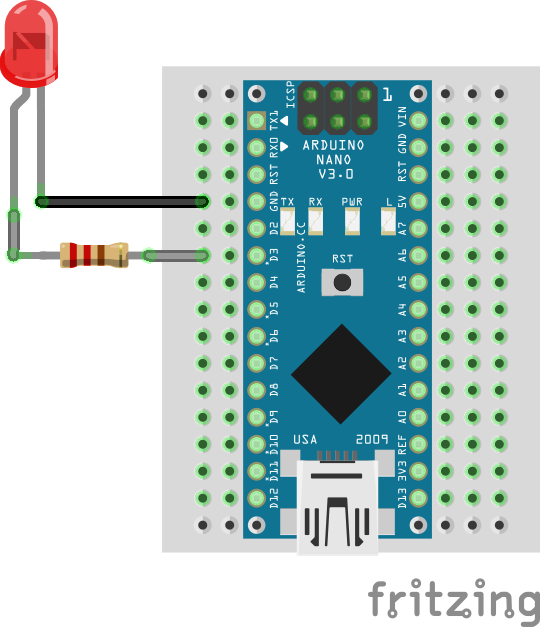
Wiring schema
Before we get into the details of LED control, let's commence by setting up a basic circuit to regulate an LED with an Arduino.
Follow these steps to wire the circuit:
Attach the longer leg (anode) of the LED to one end of the current-limiting resistor.
Connect the other end of the resistor to a digital pin on the Arduino.
Link the shorter leg (cathode) of the LED to one of the GND (ground) pins on the Arduino.
Power up the Arduino by connecting it to your computer or an appropriate power source.
Now that the wiring is in place, let's discuss the two primary methods of controlling LEDs: using digital pins and Pulse width modulation (PWM) pins.
Digital pins
Digital pins on the Arduino are binary in nature, meaning they can be either HIGH (5V) or LOW (0V). When you use a digital pin to control an LED, it can only be entirely on (HIGH) or completely off (LOW). This is suitable for fundamental on/off applications such as indicator lights and straightforward visual cues.
PWM pins
Pulse width modulation pins, on the other hand, provide a more nuanced approach to LED control. PWM allows you to achieve varying levels of brightness by rapidly toggling the LED on and off at different duty cycles. This is essential for creating effects like fading in and out, simulating sunrise/sunset, and smoothly transitioning between colors.
Arduino code
To control the LED with a digital pin, you can use the following Arduino code:
#define LED_PIN 3

void setup()
{
  pinMode(LED_PIN, OUTPUT);
}

void loop()
{
  digitalWrite(LED_PIN, HIGH); // Turn the LED on
  delay(1000);                 // Wait for one second

  digitalWrite(LED_PIN, LOW); // Turn the LED off
  delay(1000);                // Wait for one second
}
In this particular situation, you can simply pick any digital pin and set it up as an output.
Fading effect
To create the fading effect, a PWM (Pulse Width Modulation) pin is required. In the wiring diagram, we've used pin D3, but you can opt for any PWM pin that suits your particular board.
#define LED_PIN 3

void setup()
{
  pinMode(LED_PIN, OUTPUT);
}

void loop()
{
  increaseLight(LED_PIN);
  decreaseLight(LED_PIN);
}

void increaseLight(int ledPin)
{
  for (int i = 0; i <= 255; i++) {
    analogWrite(ledPin, i);

    delay(10);
  }
}

void decreaseLight(int ledPin)
{
  for (int i = 255; i >= 0; i--) {
    analogWrite(ledPin, i);

    delay(10);
  }
}
The analogWrite function that is used in the main loop of the code requires two arguments: one telling the function which pin to write to, and one indicating what PWM value to write. In order to fade the LED off and on, gradually increase the PWM value from 0 (all the way off) to 255 (all the way on), and then back to 0 once again to complete the cycle.
Conclusion
Using LEDs with an Arduino provides numerous possibilities for your projects, whether you need a straightforward indicator or wish to create captivating lighting effects. Understanding the distinction between using digital pins and PWM pins is crucial, as it determines the range of effects you can achieve. Utilize digital pins for basic on/off control and PWM pins for smooth fading and brightness adjustments. Experiment, get creative, and let your imagination shine!
Credits
Official GitHub: https://github.com/hibit-ded/led


0 Comments