Keeping time with DS1302: real-time clock on Arduino
In the fascinating world of Arduino and microcontrollers, keeping time is key. You might need to build a digital clock, a timer, or something more complex like an automated plant watering system. That's where the DS1302 module steps in. It's a handy little device that can help you keep time accurately in your Arduino projects. In this article, we'll take a closer look at the DS1302 module, understand how it works, and explore its applications.
Components
| 1x Arduino Nano (or another Arduino module) $3.41 |
| 1x Mini-breadboard
|
| 1x DS-1302 module
|
| 1x CR2032 Battery
|
| Dupont wires
|
| DS1302 library |


The DS1302 module
The DS1302 is a real-time clock (RTC) module. What does that mean? It's like a tiny digital wristwatch for your Arduino. It's good at keeping time, and it doesn't need winding or battery changes because it runs on very little power. The module connects with your Arduino through a simple interface, making it super user-friendly.
The DS1302 uses a 32.768 kHz crystal oscillator to keep track of time very precisely. It even has a backup battery, so if your Arduino loses power, it won't forget what time it is. This makes it perfect for situations where accuracy is crucial.
Wiring schema
Connecting the DS1302 module with an Arduino is a breeze. You'll need to hook up a few wires, like the data, clock, and reset pins, to the right places on your Arduino. A power supply and a backup battery are essential for uninterrupted timekeeping.
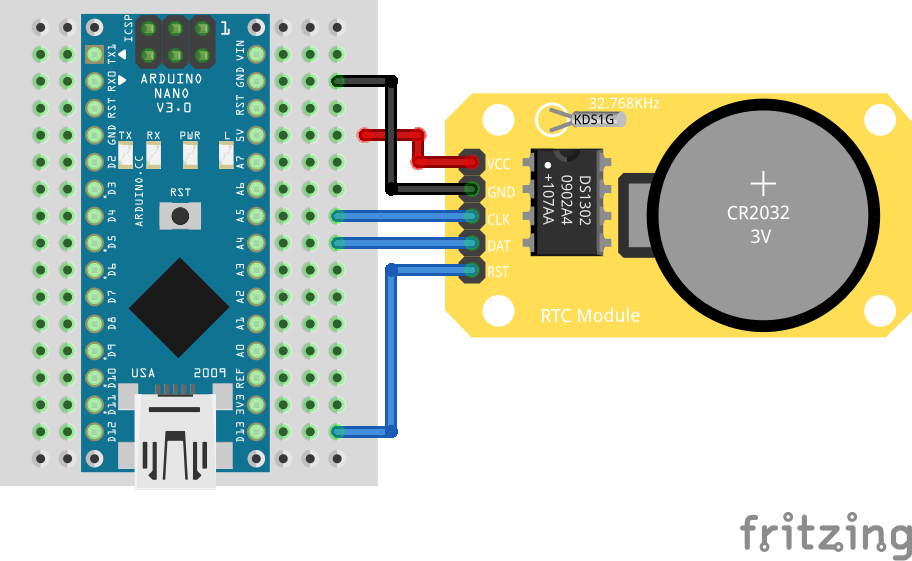
The good news is that there are plenty of libraries and example codes out there that simplify this process. So, even if you're not an expert, you can get it up and running without too much fuss.
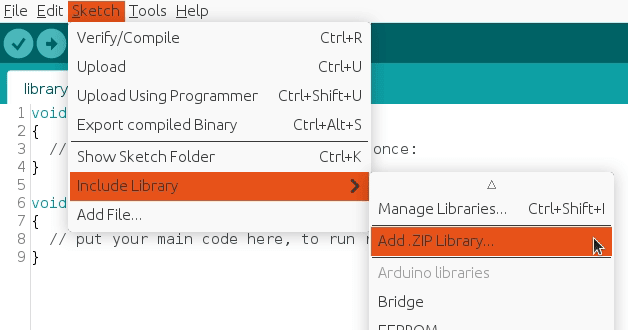
Install library for DS1302
To interact with the DS1302 sensor, we will use an existing library. This library, provides an interface that facilitates communication with the module, saving you significant time and providing a reliable and extensively tested code base. It can be downloaded from our official repository.
To import a library, open the Arduino IDE, go to Sketch > Include Library > Add .ZIP Library and select the library file downloaded from our GitHub repository.
Then you can simply use include statement:
#include "virtuabotixRTC.h"
It will include the library with predefined functions to interact with the module.
Arduino code
Let's kick things off by establishing the connection pins. After that, we'll configure the current time as the initial reference for the module. This initial setup is a one-time job because the module smartly retains this value in its memory, eliminating the need for a reset each time you upload new code.
#include "virtuabotixRTC.h"

#define DS1302_CLK_PIN A5
#define DS1302_DAT_PIN A4
#define DS1302_RST_PIN 13

#define CURRENT_SECONDS 45
#define CURRENT_MINUTES 30
#define CURRENT_HOURS 11
#define CURRENT_DAY_OF_WEEK 1
#define CURRENT_DAY_OF_MONTH 6
#define CURRENT_MONTH 11
#define CURRENT_YEAR 2023

virtuabotixRTC RTC(DS1302_CLK_PIN, DS1302_DAT_PIN, DS1302_RST_PIN);

void setup()
{
  Serial.begin(115200);

  // Once the battery is installed,
  // the module stores the value in memory
  RTC.setDS1302Time(
    CURRENT_SECONDS,
    CURRENT_MINUTES,
    CURRENT_HOURS,
    CURRENT_DAY_OF_WEEK,
    CURRENT_DAY_OF_MONTH,
    CURRENT_MONTH,
    CURRENT_YEAR
  );
}

void loop()
{
  // Allow updates of variables
  RTC.updateTime();

  Serial.print("Current Date and time: ");

  Serial.print(RTC.year);
  Serial.print("/");
  Serial.print(RTC.month);
  Serial.print("/");
  Serial.print(RTC.dayofmonth);

  Serial.print(" ");

  Serial.print(RTC.hours);
  Serial.print(":");
  Serial.print(RTC.minutes);
  Serial.print(":");
  Serial.print(RTC.seconds);

  // New line
  Serial.println();

  // Add one second delay between iterations
  delay(1000);
}
Within the main loop, our task is straightforward - we simply print the module's values, ensuring that the date and time units are clearly separated.
Automatic time detection
To simplify the setup and enable easy usage, an automated version has been created for configuring the current time. This version uses the current compilation date as the initial time for the module clock.
#include "virtuabotixRTC.h"

#define DS1302_CLK_PIN A5
#define DS1302_DAT_PIN A4
#define DS1302_RST_PIN 13

virtuabotixRTC RTC(DS1302_CLK_PIN, DS1302_DAT_PIN, DS1302_RST_PIN);

void setup()
{
  Serial.begin(115200);

  // Set sketch compiling time
  setDateTime(RTC, __DATE__, __TIME__);
}

void loop()
{
  // Allow updates of variables
  RTC.updateTime();

  Serial.print("Current Date and time: ");

  Serial.print(RTC.year);
  Serial.print("/");
  Serial.print(RTC.month);
  Serial.print("/");
  Serial.print(RTC.dayofmonth);

  Serial.print(" ");

  Serial.print(RTC.hours);
  Serial.print(":");
  Serial.print(RTC.minutes);
  Serial.print(":");
  Serial.print(RTC.seconds);

  // New line
  Serial.println();

  // Add one second delay between iterations
  delay(1000);
}
The library does not support automatic setup of the current time. Therefore, we've created an extension file, available in our official repository, that can autonomously detect and set the current time on the module.
Testing
To verify the proper functioning of our module, we use the serial monitor.
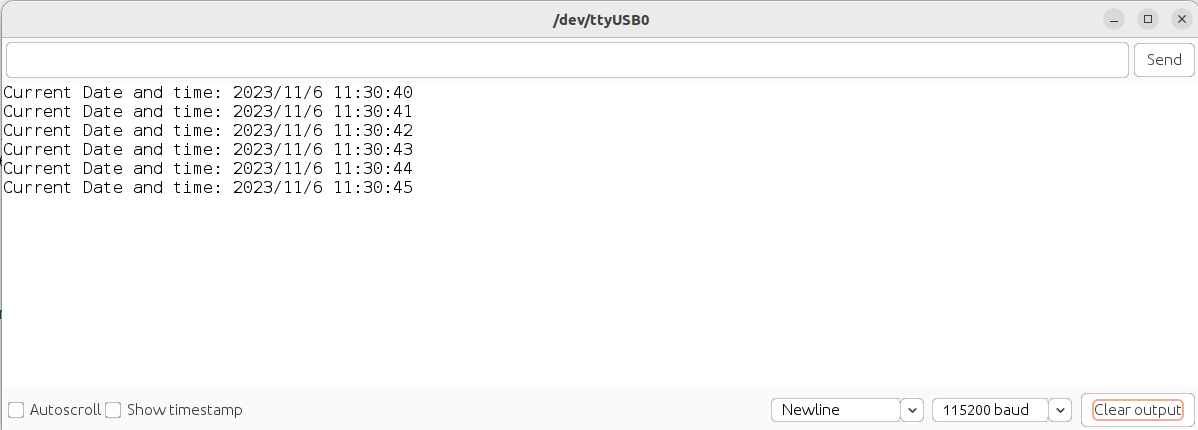
Your serial monitor should display values closely resembling those visible in the image above.
Conclusion
In a world where timing is everything, the DS1302 module and your Arduino can be a dynamic duo. It keeps your projects running like clockwork, and the best part is, it's not overly complicated to set up. It's straightforward to integrate and broadens the horizons for various time-oriented applications. So, don't wait! Embrace the precision and efficiency it offers, letting your Arduino projects seamlessly align with the rhythm of the world around them.
Credits
Official GitHub: https://github.com/hibit-dev/ds1302


0 Comments