DIY - Automated plants watering system: code
Having outlined the concept of automated watering and successfully assembled the physical components, our attention now turns to the real wizardry - the code. This article explores the intricate lines of Arduino code that transform theory into reality, breathing life into our DIY plant care project. As we step into the heart of our automated watering system, let's unravel the details that make our green vision a reality.
Automated plants watering project
DIY - Automated plants watering system: concept
DIY - Automated plants watering system: mounting
DIY - Automated plants watering system: code
DIY - Automated plants watering system
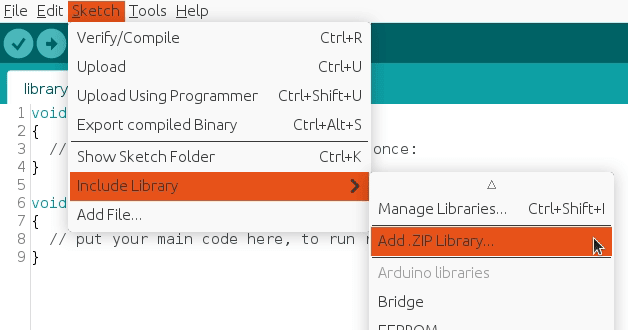
Install library for DS1302
To interact with the DS1302 sensor, we will use an existing library. This library, provides an interface that facilitates communication with the module, saving you significant time and providing a reliable and extensively tested code base. It can be downloaded from our official repository.
To import a library, open the Arduino IDE, go to Sketch > Include Library > Add .ZIP Library and select the library file downloaded from our GitHub repository.
Then you can simply use include statement:
#include "virtuabotixRTC.h"
It will include the library with predefined functions to interact with the module.
Arduino code
This Arduino code forms the backbone of our automated watering system, translating the idea of plant watering into a functional reality. At its core, this code interfaces with a real-time clock, ensuring our system is attuned to the rhythm of the day. Constants define the timeframes for morning and evening watering sessions, while designated pins for LEDs, buttons, and a potentiometer facilitate the communication among physical components.
In the setup phase, the code initializes pins and stages a brief, illuminating sequence with LEDs, symbolizing the system's awakening. As the main loop takes the stage, it constantly monitors the real-time clock and user inputs. The code continuously checks the time and conditions to trigger morning and evening watering cycles, while also providing a manual watering option through the push button. The iteration transpires every 5 seconds, ensuring a vigilant and responsive approach to the needs of plant care.s.
#include "virtuabotixRTC.h"

#define MORNING_WATERING false
#define EVENING_WATERING true

#define MORNING_WATERING_HOUR 8
#define EVENING_WATERING_HOUR 20

#define LED_RED_PIN 7
#define LED_GREEN_PIN 8

#define BUTTON_PUSH_PIN 10
#define BUTTON_TOGGLE_PIN 2

#define POTENTIOMETER_PIN A0
#define POTENTIOMETER_MIN_SECONDS 0
#define POTENTIOMETER_MAX_SECONDS 10

#define PUMP_BASE_PIN 11

#define DS1302_CLK_PIN A5
#define DS1302_DAT_PIN A4
#define DS1302_RST_PIN 13

bool morningWatered = false;
bool eveningWatered = false;

struct button {
  byte pressed = 0;
};

struct toggle {
  byte on = 0;
};

struct potentiometer {
  byte level = 0;
};

button button;
toggle toggle;

potentiometer potentiometer;

virtuabotixRTC RTC(DS1302_CLK_PIN, DS1302_DAT_PIN, DS1302_RST_PIN);

void setup()
{
  // Set pin mode for LEDs
  pinMode(LED_RED_PIN, OUTPUT);
  pinMode(LED_GREEN_PIN, OUTPUT);

  // Turn red LED ON (setup in progress...)
  digitalWrite(LED_RED_PIN, HIGH);

  delay(3000);

  // Set pin mode for buttons
  pinMode(BUTTON_TOGGLE_PIN, INPUT_PULLUP);
  pinMode(BUTTON_PUSH_PIN, INPUT_PULLUP);

  // Set pin mode for potentiometer
  pinMode(POTENTIOMETER_PIN, INPUT);

  // Set pin mode for water pump
  pinMode(PUMP_BASE_PIN, OUTPUT);

  // Set sketch compiling time
  setDateTime(RTC, __DATE__, __TIME__);

  // Turn red LED OFF and green LED ON
  digitalWrite(LED_RED_PIN, LOW);
  digitalWrite(LED_GREEN_PIN, HIGH);

  delay(1500);

  // Turn green LED OFF
  digitalWrite(LED_GREEN_PIN, LOW);
}

void loop()
{
  // Allow updates of variables
  RTC.updateTime();

  // Read input values
  button.pressed = isButtonPressed(BUTTON_PUSH_PIN);
  potentiometer.level = readPotentiometerLevelMapped(POTENTIOMETER_PIN);
  toggle.on = isToggleOn(BUTTON_TOGGLE_PIN);

  // Turn ON morning watering
  if (MORNING_WATERING && RTC.hours == MORNING_WATERING_HOUR) {
    if (morningWatered == false) {
      morningWatered = true;

      int wateringMilliseconds = getMillisecondsByPotentiometerLevel(potentiometer.level);

      turnPumpTemporaryOn(wateringMilliseconds);
    }
  } else {
    morningWatered = false;
  }

  // Turn ON evening watering
  if (EVENING_WATERING && RTC.hours == EVENING_WATERING_HOUR) {
    if (eveningWatered == false) {
      eveningWatered = true;

      int wateringMilliseconds = getMillisecondsByPotentiometerLevel(potentiometer.level);

      turnPumpTemporaryOn(wateringMilliseconds);
    }
  } else {
    eveningWatered = false;
  }

  // Turn ON manual watering
  if (button.pressed) {
    turnPumpOn();

    // Wait while the button is ON
    do {
      button.pressed = isButtonPressed(BUTTON_PUSH_PIN);

      delay(100);
    } while (button.pressed);

    turnPumpOff();
  }

  delay(5000); // Iterate every 5 seconds
}
Note that the push button triggers manual watering when pressed, adding a layer of user interactivity. Due to the 5000ms delay in the loop function, there might be a delay between pressing the button and the corresponding action. Nevertheless, when the process initiates, the green LED will illuminate.
The potentiometer values manage the water supply to the plant. The code calculates the pump's operational time based on the potentiometer's position. To ensure control and efficiency, we've established limits, where the minimum potentiometer value corresponds to a pump duration of 0 seconds, and the maximum allows up to 10 seconds. These settings remain easily customizable through designated constants.
It's worth mentioning that we've opted to disable the morning watering for our plant, choosing to automate the process exclusively in the evenings. Additionally, while the switch button currently lacks a specific assignment, it stands ready for future functionalities.
Please be aware that the provided code snippet includes only the main segment. The auxiliary functions and definitions can be found in our official GitHub repository.
Conclusion
The presented Arduino code serves as the operational heart of our automated watering system, consistently monitoring real-time data and user inputs. Its key role is to activate morning and evening watering cycles, currently programmed for 8 in the morning and 20 in the evening, with customizable constants. The iterative loop ensures the system remains alert and responsive to the unique needs of plant care. The entire code is highly customizable through constants, enabling effortless adjustments to the configuration of the plant care station's operation.
Credits
Official GitHub: https://github.com/hibit-dev/plants-care


0 Comments