Repository cache in Laravel
In modern web applications, optimizing data retrieval is crucial to improving performance and user experience. One common practice is caching database queries to reduce redundant calls to the database. While Laravel offers built-in caching features, in some cases, you may want to implement custom repository caching manually to better control your caching mechanism. This article will walk you through implementing repository caching in Laravel 12, explaining the steps involved and how to achieve better performance in your application.
Setting up the framework
For the purposes of this guide, the following command was used to initialize the Laravel project.
composer create-project laravel/laravel:^12.0 laravel12-cache
Run Laravel's local development server:
php artisan serve
Establishing Redis connection
If Redis is not yet installed, make sure to follow the instructions in our previous article on how to install Redis before proceeding.
Once Redis is installed, you need to configure Laravel to connect to it. Laravel uses the .env file to manage environment-specific settings, and the default Redis configuration points to 127.0.0.1:6379, but you can modify it if needed. For instance, your .env file should include entries like:
REDIS_CLIENT=phpredis
REDIS_HOST=127.0.0.1
REDIS_PASSWORD=null
REDIS_PORT=6379
Once this configuration is in place, Laravel will be able to connect to Redis.
Exploring the Repository Pattern
The Repository Pattern is a structural design pattern that provides a clean separation between the business logic of an application and its data access logic. It acts as an intermediary, abstracting the complexities of querying and retrieving data from underlying storage systems. By organizing data access into repositories, the pattern promotes cleaner, more modular code that is easier to maintain and test.
Repositories provide a consistent API for interacting with data, whether it's fetching individual records, executing complex queries, or performing data transformations. This consistency simplifies the logic of the application, making it more readable, reusable, and easier to manage. The pattern also encourages loose coupling, as the rest of the application doesn't need to be aware of how data is retrieved or persisted, just that it can interact with the repository through defined methods.
Beyond the structure it provides, the Repository Pattern can be highly beneficial for optimizing application performance, especially when combined with data caching. By caching frequently accessed data within the repository layer, you can reduce redundant database queries and improve response times. This approach not only accelerates data retrieval but also minimizes the load on the database, leading to improved scalability and efficiency in the application.
Establishing the entry point
A controller will be created to serve as the entry point for interacting with the repository logic, handling incoming requests and providing a place to call repository methods. Running the following command will generate a new file called RepositoryController.php in the app/Http/Controllers directory:
php artisan make:controller RepositoryController
Once the controller is created, you need to define a route that will connect a URL endpoint to the controller's actions. In the routes/web.php file, you can add a route that listens for HTTP requests to a specific URL like this:
Route::get('/cache', [App\\Http\\Controllers\\RepositoryController::class, 'get']);You ensure that any GET request to the /cache URL will be directed to the get method within the RepositoryController. At this point, the get method doesn't need to exist yet, but setting up this route gives you a place to add functionality later.
To access the route from your browser, simply navigate to the URL defined in the route. In this case, open your browser and go to http://127.0.0.1:8000/cache. If everything is set up correctly, this will trigger the get method in the RepositoryController and you'll be able to see the response for that route.
Defining the contract and database repository
The purpose of our tutorial is to highlight how links operate and how to configure repositories effectively within Laravel. For this, we'll use a simple repository that generates fake data for testing purposes.
To start, let's define the contract for our user repository, allowing us to retrieve a user based on their unique ID.
<?php

namespace App\\Repository;

interface UserRepositoryInterface
{
    public function store(array $user): void;

    public function getById(int $userId): ?array;

    public function delete(array $user): void;
}
Next, we'll implement the repository contract, which can be easily adapted to work with different database systems such as MySQL, MongoDB, or any other database.
<?php

namespace App\\Repository\\Database;

use App\\Repository\\UserRepositoryInterface;

class UserRepository implements UserRepositoryInterface
{
    public function store(array $user): void
    {
        // TODO store in DB
    }

    public function getById(int $userId): ?array
    {
         // TODO retrieve from DB

        return [
            'id' => $userId,
            'name' => 'John',
        ];
    }

    public function delete(array $user): void
    {
        // TODO delete from DB
    }
}
In Laravel, the repository interface needs to be bound to its implementation for proper dependency injection. This binding is done in the register method of the AppServiceProvider.
public function register(): void
{
    $this->app->bind(UserRepositoryInterface::class, UserRepository::class);
}
As previously mentioned, for testing purposes and to simplify the tutorial, we won't be fetching data from an actual database; instead, we will mock the returned data.
Testing the repository
To confirm the setup is working correctly, we've implemented the get method in RepositoryController.
<?php

namespace App\\Http\\Controllers;

use App\\Repository\\UserRepositoryInterface;

use Illuminate\\Http\\JsonResponse;

class RepositoryController extends Controller
{
    public function get(UserRepositoryInterface $userRepository): JsonResponse
    {
        $user = $userRepository->getById(1);

        return response()->json($user);
    }
}
Accessing the route will show up the following JSON message:
{
  "id": 1,
  "name": "John"
}
Creating cache repository
Since we already have the contract defined, the next step is to implement a cache-based version of the repository. This version will use Laravel's caching system to store and retrieve user data, reducing the number of database queries needed.
The repository will follow the same contract as the original repository but will focus solely on handling data retrieval and storage within the cache. It will attempt to fetch user data based on the user ID. If the data is available in the cache, it will return the cached result; otherwise, it will return null, indicating no cached data is found. Additionally, the repository will handle storing and deleting data in the cache.
<?php

namespace App\\Repository\\Cache;

use App\\Repository\\UserRepositoryInterface;
use Illuminate\\Support\\Facades\\Cache;

class UserRepository implements UserRepositoryInterface
{
    const CACHE_PREFIX = 'users';
    const CACHE_TTL_SECONDS = 30;

    public function store(array $user): void
    {
        $userId = $user['id'];

        Cache::set(
            sprintf('%s:%d', self::CACHE_PREFIX, $userId),
            $user,
            self::CACHE_TTL_SECONDS
        );
    }

    public function getById(int $userId): ?array
    {
        return Cache::get(sprintf('%s:%d', self::CACHE_PREFIX, $userId));
    }

    public function delete(array $user): void
    {
        $userId = $user['id'];

        Cache::forget(sprintf('%s:%d', self::CACHE_PREFIX, $userId));
    }
}
The store and delete methods provide full control over caching by allowing user data to be saved after retrieval or when new data needs to be stored, as well as removed when necessary.
Building cache handling logic
Both the cache and database repositories are used in the final UserRepository class, which serves as the entry point to access user data. It first attempts to retrieve the data from the cache, and if not found, queries the database. Once the data is fetched from the database, it is cached for future use, optimizing the application by reducing database queries and making use of the cache.
The following image visualize how the repositories are structured while adhering to the same contract.
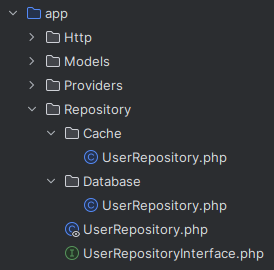
Once we understand this structure, we'll move on to the final code implementation of the UserRepository that manages both cache and database retrieval, ensuring that user data is fetched efficiently. Ensure that you update the AppServiceProvider to bind this repository as the primary implementation of the contract.
<?php

namespace App\\Repository;

use App\\Repository\\Cache\\UserRepository as CacheUserRepository;
use App\\Repository\\Database\\UserRepository as DatabaseUserRepository;

readonly class UserRepository implements UserRepositoryInterface
{
    public function __construct(
        private CacheUserRepository $cacheUserRepository,
        private DatabaseUserRepository $databaseUserRepository,
    ) {
    }

    public function store(array $user): void
    {
        $this->databaseUserRepository->store($user);
        $this->cacheUserRepository->store($user);
    }

    public function getById(int $userId): ?array
    {
        $user = $this->cacheUserRepository->getById($userId);
        $source = 'cache';

        if ($user === null) {
            $user = $this->databaseUserRepository->getById($userId);
            $source = 'database';

            $this->cacheUserRepository->store($user);
        }

        return array_merge($user, ['source' => $source]);
    }

    public function delete(array $user): void
    {
        $this->databaseUserRepository->delete($user);
        $this->cacheUserRepository->delete($user);
    }
}
This structure allows for a clean separation of concerns, making the code easy to maintain and extend. You can add additional data sources or change the caching mechanism without disrupting the rest of the application.
Testing the repository
When accessing the identical route established for the standard repository, you should consistently observe the data retrieved for the specified user. There's no need to change the controller since it's already compatible with the repository contract.
When testing the setup, the first time you access the route, the user data will be fetched from the database, as the cache is initially empty.
{
  "id": 1,
  "name": "John",
  "source": "database"
}
On subsequent requests, the data will be retrieved from the cache instead of the database, since it was cached during the first request.
{
  "id": 1,
  "name": "John",
  "source": "cache"
}
The cached data will automatically expire 10 seconds after storage, as specified in the repository configuration. You have the flexibility to adjust this expiration period, whether you want to extend it, reduce it, or set it to zero if there's no need to invalidate the cache.
Conclusion
Implementing repository caching in Laravel gives you full control over caching strategies and invalidation logic. By integrating Redis (or any other caching system) into your repositories, you can improve performance and reduce redundant database queries. This approach also ensures that your data remains fresh by providing an easy way to manage cache expiration and invalidation. With repository caching in place, your Laravel application will be faster, more efficient, and better able to scale as traffic grows.
Credits
Official GitHub: https://github.com/hibit-dev/laravel12-cache


0 Comments