How to install PHP-FPM on Ubuntu
By default Nginx is not capable of processing dynamic web pages with PHP so it requires the use of specific additional plugins for this purpose. One of these plugins is FPM (FastCGI Process Manager). FPM is an alternative PHP FastCGI implementation with some additional features (mostly) useful for heavy-loaded sites. It is the preferred method of processing PHP pages with Nginx and is faster than traditional CGI based methods.
Prerequisites
Before installing PHP-FPM you will need a working NGINX setup. If you do not already have it you can take a look to our Nginx installation and configuration tutorial.
Installing PHP-FPM
PHP-FPM is available and can be installed using the apt packaging system:
sudo apt-get update && sudo apt-get install php7.4-fpm
The above command will download and install all of the necessary dependencies. Once PHP-FPM is installed, you can check the successful PHP installation with the command:
php -v
The output will show the installed version of PHP:

Configuring Nginx
Now that you have PHP-FPM installed, you will need to update the Nginx configuration file (with nano or any other editor):
sudo nano /etc/nginx/sites-available/default
Uncomment the following lines for PHP-FPM to run on our server:
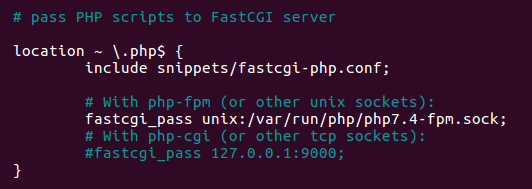
Don't forget to add the index.php to the indexes list:
![]()
Save the configuration file and restart Nginx server to apply the changes:
sudo systemctl restart nginx.service
We have successfully configured our Nginx server with PHP-FPM. We can now host our website.


0 Comments