How to use an analog module with Arduino
The KY-023 is an easy-to-use analog joystick. The joystick uses a biaxial potentiometer to control the X and Y axis. It also has an integrated push button. In this tutorial, it is shown how to connect the KY-023 joystick with the Arduino and how to use it.
Components
| 1x Arduino Nano (or another Arduino module)
|
| 1x Mini-breadboard
|
| 1x Analog joystick module (KY-023)
|
| Dupont wires
|


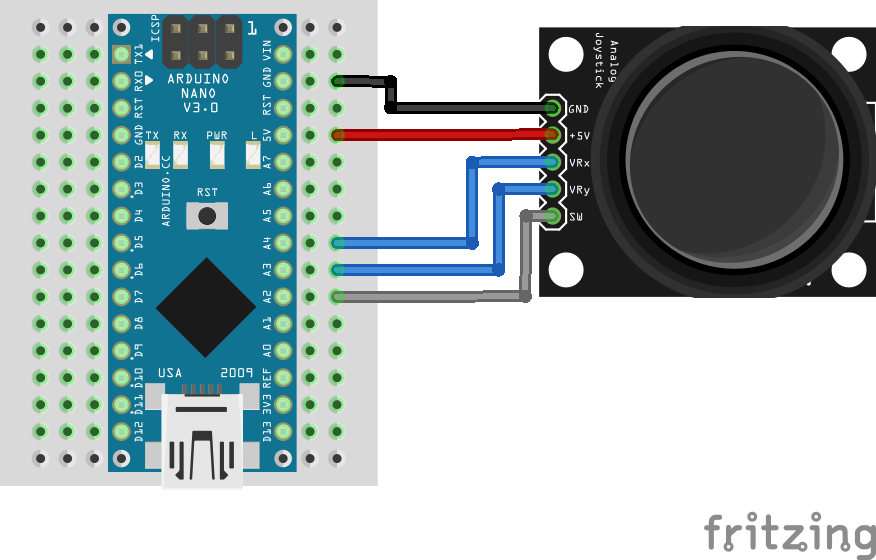
Wiring schema
Analog module have five pins. Besides the power pins (5V and GND) the module offers two analog and one digital pins. Analog inputs are used to measure the joystick position and the digital input is used for the button (actually we are using an analog input but it acts as digital).
When the stick is turned all the way in one direction, there are 0 volts going to the pin, and we read 0. When the stick is turned all the way in the other direction, there are 5 volts going to the pin and we read 1023. It applies for both axes (x and y).
Arduino code
We've defined two structs (called analog and button) to represent the state of the analog module. The serial monitor will output the value of X axis, Y axis and button state with 200ms delay to make the output more readable.
There are two correction constants to represent the default axis values as zero (0).
#define ANALOG_X_PIN A2
#define ANALOG_Y_PIN A3
#define ANALOG_BUTTON_PIN A4

//Default values when axis not actioned
#define ANALOG_X_CORRECTION 128
#define ANALOG_Y_CORRECTION 128

struct button {
  byte pressed = 0;
};

struct analog {
  short x, y;

  button button;
};

void setup()
{
  pinMode(ANALOG_BUTTON_PIN, INPUT_PULLUP);

  Serial.begin(115200);
}

void loop()
{
  analog analog;

  analog.x = readAnalogAxisLevel(ANALOG_X_PIN) - ANALOG_X_CORRECTION;
  analog.y = readAnalogAxisLevel(ANALOG_Y_PIN) - ANALOG_Y_CORRECTION;

  analog.button.pressed = isAnalogButtonPressed(ANALOG_BUTTON_PIN);

  Serial.print("X:");
  Serial.println(analog.x);

  Serial.print("Y:");
  Serial.println(analog.y);

  if (analog.button.pressed) {
    Serial.println("Button pressed");
  } else {
    Serial.println("Button not pressed");
  }

  delay(200);
}

byte readAnalogAxisLevel(int pin)
{
  return map(analogRead(pin), 0, 1023, 0, 255);
}

bool isAnalogButtonPressed(int pin)
{
  return digitalRead(pin) == 0;
}
Note: read value is mapped to [0-255] range to represent it with only 1 byte.
Credits
Official GitHub: https://github.com/hibit-dev/analog


0 Comments