Getting started with Arduino
Arduino is a small programmable board that lets you control real electronic components with code. You can connect sensors, buttons, motors, LEDs, displays, and many other modules, then write a few lines in C or C++ to decide how everything should behave. The board reads inputs, processes them in real time, and reacts through its output pins. To start building solid projects, it is important to understand how the boards work, how to choose the right model, how to set up the development tools, and how key electronics concepts such as resistors, transistors, communication protocols, and PWM fit together in a practical circuit.
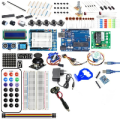
Components
| 1x Starter Kit $75.82 |
What is Arduino?
Arduino is an open source platform built around programmable microcontroller boards. Each board is a small, self contained computer designed to run a single program that you upload to it. Once powered, it executes that program continuously and interacts with the physical world through its input and output pins.
Those pins allow the board to read digital signals such as button presses, measure analog voltages from sensors, and control devices like LEDs, motors, or relays. The Arduino environment simplifies low level configuration through functions like pinMode, digitalWrite, and analogRead, so you can focus on system behavior instead of hardware registers. At the same time, it stays close enough to the underlying electronics to help you understand how embedded systems actually work.
Overview of Arduino boards
Arduino offers different boards designed for different project requirements. They share the same programming model and development environment, but vary in size, processing power, voltage levels, and number of input and output pins. Choosing the right board depends on how many devices you plan to connect, how much performance you need, and the physical constraints of your project.
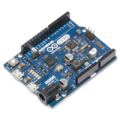
Arduino Uno
| 1x Arduino Uno (or compatible Arduino module) $3.76 |

Arduino Uno is the most common starting point:
ATmega328P microcontroller
14 digital I O pins
6 analog inputs
5V logic
USB interface for programming and power
It is ideal for learning, prototyping, and most general purpose projects. For a complete technical breakdown and pinout diagrams, see the dedicated article about the Arduino Uno.
Arduino Nano
| 1x Arduino Nano (or compatible Arduino module) $3.39 |

Arduino Nano provides similar functionality to the Uno in a much smaller format:
ATmega328P microcontroller
14 digital I O pins
8 analog inputs
5V logic
Compact, breadboard friendly design
It is well suited for compact builds or embedded systems. For a complete technical breakdown and pinout diagrams, see the dedicated article about the Arduino Nano.
Arduino Mega 2560
| 1x Arduino Mega (or compatible Arduino module) $3.35 |
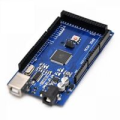
Arduino Mega 2560 is designed for larger projects that require many connections:
ATmega2560 microcontroller
54 digital I O pins
16 analog inputs
5V logic
Multiple hardware serial ports
It is useful for robotics, 3D printers, or complex control systems. For a complete technical breakdown and pinout diagrams, see the dedicated article about the Arduino Mega.
Arduino Zero
| 1x Arduino Zero (or compatible Arduino module) $3.76 |
Arduino Zero is a 32 bit board based on the ARM Cortex M0+ processor designed for more advanced projects.
32 bit architecture with higher precision timers
20 digital I O pins
6 analog inputs
3.3V logic
Onboard debugger (EDBG)
It is suited for projects that need more processing power, precision, or advanced features like real-time debugging. For a complete technical breakdown and pinout diagrams, see the dedicated article about the Arduino Zero.
Arduino Due
| 1x Arduino Due (or compatible Arduino module) $45.30 |
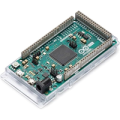
Arduino Due is based on a 32 bit ARM Cortex M3 processor:
Higher clock speed
54 digital I O pins
12 analog inputs
3.3V logic
More advanced peripherals
It is appropriate for projects that need more processing power. For a complete technical breakdown and pinout diagrams, see the dedicated article about the Arduino Due.
Prototyping Arduino projects
Before building a final device, it is important to prototype your circuit. Prototyping allows you to test ideas, validate connections, and debug issues without soldering or creating a permanent design.
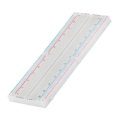
The most common tool for this stage is a breadboard. A breadboard is a reusable plastic board with internal metal strips that connect groups of holes together. By inserting components and jumper wires into these holes, you can create temporary circuits quickly. The side rails are typically used for power distribution, while the central area is organized in rows connected horizontally.
To connect components on a breadboard to an Arduino board, you typically use Dupont wires. These are flexible jumper wires with connectors that fit into the breadboard and the Arduino's pin headers, making it easy to move or rearrange connections.
| Breadboard
|
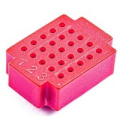
| Mini-breadboard
|
| Micro-breadboard $1.33 |
| Dupont wires
|


Using a breadboard lets you:
Test circuits without soldering
Modify wiring in seconds
Experiment safely with small components
Iterate quickly during development
Good prototyping habits include:
Always connecting GND consistently
Checking voltage levels before powering the circuit
Keeping wiring organized
Avoiding direct connection of high current loads to Arduino pins
For detailed guidance on correct wiring and internal connections, refer to Simple steps for building circuits with breadboards.
Essential electronic components
When prototyping with Arduino, some basic electronic components keep showing up in almost every project. Understanding what they do and how they fit into a circuit is more important than knowing every calculation at first. Here's a quick overview with references to your existing articles for deeper guidance.
Resistors
| Resistors kit
|

Resistors limit current, divide voltages, and stabilize signals. The most common types you'll encounter are:
Standard resistors for current limiting, like with LEDs
Pull-up and pull-down resistors to prevent floating inputs
For more details and examples, see The essential guide to resistors and Pull-up and Pull-down.
Transistors
| Transistor $0.65 |

Transistors are electronic switches or amplifiers. They allow a small signal from the Arduino to control higher power components like motors or relays. They are essential when the board cannot provide enough current directly.
For practical use, check Transistors the building blocks of our digital world and Using transistors in electronic circuits.
Capacitors
Capacitors store and release electrical energy. They are commonly used to smooth voltage fluctuations, filter noise, or provide short bursts of power.
Other components
Beyond resistors, transistors, and capacitors, several other components are commonly used in Arduino projects:
LEDs: light emitting diodes that provide visual feedback or indicators. Usually paired with a resistor to limit current.
Switches and Buttons: manual input devices that allow the user to interact with the circuit. Using pull-up or pull-down resistors ensures stable readings.
Sensors: devices that measure physical phenomena like temperature, light, or motion and convert them into electrical signals.
Modules: pre-assembled circuits often including sensors, displays, or communication interfaces, designed to simplify integration with Arduino boards.
This overview highlights the main building blocks used in most Arduino projects. For detailed examples and usage patterns, refer to the Arduino Modules section.
Arduino IDE
The Arduino IDE is the software used to write, compile, and upload programs, or sketches, to your Arduino board. It provides a straightforward interface that hides most of the complex hardware details, so you can focus on how your project behaves rather than the microcontroller’s internal registers.
You can install and configure the IDE by following Getting started with the Arduino IDE, which covers selecting your board and serial port, managing libraries, and running your first sketch.
| Arduino IDE |

Two built-in tools are especially useful for testing and debugging: the Arduino Serial Monitor, which lets the board exchange text data with your computer in real time, and the Arduino Serial Plotter, which turns numeric values sent by the board into live graphs. For more guidance, see Using Arduino Serial Monitor tool and Using Arduino Serial Plotter tool. These tools make it easier to check sensor readings, track variable values, and visualize changing signals without needing extra software.
Arduino code structure and execution
Arduino programs, called sketches, are written in a simplified C/C++ language inside the Arduino IDE. The IDE provides a code editor with highlighted syntax, which makes it easier to read, spot errors, and organize your program.
Every sketch has two main functions: setup and loop. The setup function runs once when the board powers on or resets. It is used to initialize pins, configure sensors, or start communication protocols. The loop function runs repeatedly after setup finishes, controlling the ongoing behavior of your project.
void setup() {
  // runs once at startup
}

void loop() {
  // runs continuously
}
The IDE also offers built-in functions to interact with hardware and manage timing:
pinMode(pin, mode)sets a pin as input or outputdigitalWrite(pin, value)sets a digital output HIGH or LOWdigitalRead(pin)reads a digital inputanalogRead(pin)reads an analog sensor valueanalogWrite(pin, value)outputs a PWM signal
To run a program, you write your sketch in the editor, click Upload, and the Arduino board executes it automatically. Once uploaded, the sketch runs continuously, even if the board is disconnected from the IDE, allowing your project to operate independently.
Conclusion
Arduino makes it simple to turn ideas into working electronic projects by combining accessible hardware, a user-friendly IDE, and a consistent programming model. By understanding the boards, basic components, prototyping tools, and code structure, you can start experimenting, testing, and building projects. Each project is an opportunity to learn, iterate, and expand your skills while seeing your code come to life in the real world.
Resources
For a broader overview of boards, compatible modules and projects, you can visit HiBit - Arduino section.
Arduino Modules: https://www.hibit.dev/arduino/modules
Arduino Projects: https://www.hibit.dev/arduino/projects


0 Comments