DIY - Remote control car running on Arduino: code
The physical assembly of the car has been completed with all the components properly installed and ready for use. The next steps involve reprogramming the Arduino Nano with the appropriate software to enable all the features, including pairing the car with the AirControl joystick via the NRF24L01 module.
Below you will find links to previous project posts.
Merin project
DIY - Remote control car running on Arduino: concept
DIY - Remote control car running on Arduino: mounting
DIY - Remote control car running on Arduino: code
DIY - Remote control car running on Arduino
Installing Arduino libraries
Using existing libraries, we can communicate with the NRF24L01 module and save time. These libraries have been tested and improved by the community over the years, providing a robust code base. We strongly suggest using these libraries instead of building everything from scratch. The same applies to the AirControl library that simplifies the usage by providing pre-defined structures.
These libraries can be downloaded from our official repository:
RF24 official library: Download here
AirControl official library: Download here
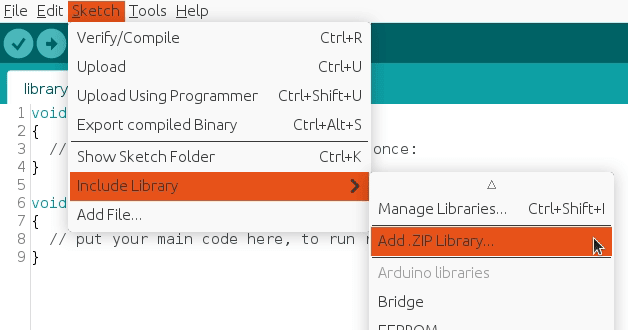
To import a library, open the Arduino IDE, go to Sketch > Include Library > Add .ZIP Library and select the library file downloaded from our GitHub repository.
Then you can simply use include statement:
#include "RF24.h"
#include "nRF24L01.h"
#include "AirControl.h"
AirControl library
The AirControl library defines structures for the joystick and its control elements. These structures contain information about each control element and allow us to know the current state of each element at any given moment.
struct button {
    byte pressed = 0;
};

struct toggle {
    byte on = 0;
};

struct potentiometer {
    byte level = 0;
};

struct analog {
    short x, y;

    button button;
};

//Max size of this struct is 32 bytes - NRF24L01 buffer limit
struct air_control {
    char key[10] = "hibit";

    struct {
      analog left, right;
    } analogs;

    struct {
      toggle upper, lower;
    } toggles;

    struct {
      struct {
        button upper, lower;
      } left, right;
    } buttons;

    struct {
      potentiometer left, right;
    } potentiometers;
};
The library additionally includes a debug function that displays the current state of the controller.
Remote control
The advantage of using custom components and the AirControl joystick is the ability to fully customize the communication. This allows us to assign specific functions to buttons and control various features in the way we prefer.
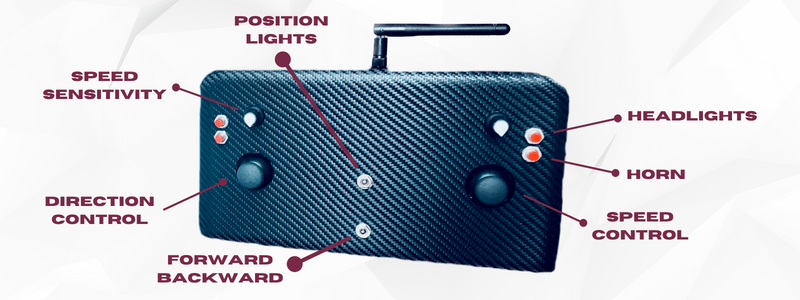
The image displayed above provides a clear overview of how we have mapped the different buttons and components of the AirControl joystick to control various functions of the car. By mapping the different joystick components to specific functions, we are able to have full control over the car's movements and other features. By reading the code in the following section, it will become apparent how each button is utilized.
Merin Arduino code
The source code for the Merin project is organized into separate logical files with descriptive names, each responsible for a specific component or a part of it. The main.ino file contains the program's entry point and definitions, while the remote car logic is contained in the merin.ino file. All functions in this file use a common language and are well-documented with comments to clarify certain sections of code.
void control()
{
  bool hasLightsOn = airControl.toggles.upper.on;

  // Driving dark places?
  if (airControl.buttons.right.upper.pressed || hasLightsOn) {
    headlightsOn();
  } else {
    lightsOff();
  }

  // Setting direction
  if (airControl.toggles.lower.on) {
    if (isMotorDirectionUnset(motorSpeed) || isMotorDirectionForward(motorSpeed)) {
      brakelightsOn();
      switchDirectionBackward();
    }
  } else {
    if (isMotorDirectionUnset(motorSpeed) || isMotorDirectionBackward(motorSpeed)) {
      brakelightsOn();
      switchDirectionForward();
    }
  }

  // Turning left or right?
  if (airControl.analogs.left.x > 50) {
    turnRight();
  } else if (airControl.analogs.left.x < -50) {
    turnLeft();
  } else {
    turnNone();
  }

  // Setting speed
  if (airControl.analogs.right.y < -10 ) {
    brakelightsOn();
    brake(airControl.analogs.right.y);
  } else {
    // Recheck lights
    if (hasLightsOn) {
      lightsOn();
    } else {
      brakelightsOff();
    }

    if (airControl.analogs.right.y > 15) {
      accelerate(airControl.analogs.right.y, airControl.potentiometers.left.level);
    } else {
      brakeGradually(random(2));
    }
  }


  // Make some noise!
  if (airControl.buttons.right.lower.pressed) {
    hornOn();
  } else {
    hornOff();
  }

  delay(30);
}

void switchDirectionBackward()
{
  brakeUntilStop();
  setMotorDirectionBackward(motorSpeed);
  sendToSpeedMotor();
}

void switchDirectionForward()
{
  brakeUntilStop();
  setMotorDirectionForward(motorSpeed);
  sendToSpeedMotor();
}

void accelerate(int speed, byte precision)
{
  int speedToApply = map(speed, 0, 127, 0, precision);

  if (speedToApply < motorSpeed.speed) {
    return;
  }

  setMotorSpeed(motorSpeed, speedToApply);
  sendToSpeedMotor();
}

void brake(int speed)
{
  int value = map(speed, 0, -127, 0, motorSpeed.speed);

  setMotorSpeed(motorSpeed, motorSpeed.speed - value);
  sendToSpeedMotor();
}

void brakeGradually(int delta)
{
  int value = max(0, motorSpeed.speed - delta);

  setMotorSpeed(motorSpeed, value > 30 ? value : 0);
  sendToSpeedMotor();
}

void brakeUntilStop()
{
  setMotorSpeed(motorSpeed, 0);
  unsetMotorDirection(motorSpeed);
  sendToSpeedMotor();

  delay(100);
}

void turnNone()
{
  unsetMotorDirection(motorDirection);
  sendToDirectionMotor();
}

void turnLeft()
{
  setMotorDirectionForward(motorDirection);
  sendToDirectionMotor();
}

void turnRight()
{
  setMotorDirectionBackward(motorDirection);
  sendToDirectionMotor();
}
Note: the snippet is part of Arduino project located in our GitHub repository with the code separated in different logical files.
Code explanation
The speed control joystick is used for acceleration with positive values and braking with negative ones. To prevent errors with small values, a threshold has been set to ignore them. The same approach is taken with the direction analog module, but with a higher threshold since there are only two turn states.
The car's speed will increase with higher provided values and gradually decrease to 0 without acceleration. It simulates the effect of inertia instead of abruptly stopping the car. To improve speed control, a sensitivity rate can be set using the right side potentiometer. When the shaft is turned to maximum, the speed control joystick will be in the highest sensitivity mode.
As a quick note, when the car is braking, the corresponding rear red lights turn on. When the position lights are on, the braking lights can still be distinguished as they shine brighter than the regular position lights.
Conclusion
The Arduino Nano acts as the main control unit for the car, allowing us to coordinate and manage all of its functions. This provides us with the flexibility to personalize the car to meet our specific needs and increase its versatility beyond its original capabilities. It is recommended to clone the repository and review all the files to gain a better understanding of the interconnections and the workings of the whole system.
Credits
Official GitHub: https://github.com/hibit-dev/merin
Official AirControl GitHub: https://github.com/hibit-dev/aircontrol


0 Comments