DIY - Remote control car running on Arduino: mounting
With the idea of making a remote-controlled car in mind, we began our investigation by disassembling the frame to uncover its internal components and understand how they work. By gaining a clear understanding of the car's original configuration, we were able to approach the modifications with greater confidence, knowing what changes were necessary and how they would integrate with the existing system.
After the initial inspection and disassembly, the team was able to identify which components could be repurposed, which ones could be improved, and which ones were not necessary. We also identified areas where we could introduce new features to enhance the car's functionality.
Below you will find links to previous project posts.
Merin project
DIY - Remote control car running on Arduino: concept
DIY - Remote control car running on Arduino: mounting
DIY - Remote control car running on Arduino: code
DIY - Remote control car running on Arduino
Prerequisites
Reading the AirControl documentation is highly recommended as it will serve as the car controller. Additionally, we suggest reviewing the L298N motor driver, which will be employed in the project, and familiarizing oneself with buzzers and how they work.
Components
| 1x Arduino Nano (or another Arduino module) $3.39 |
| 1x Mini-breadboard
|
| 1x NRF24L01 (or NRF24L01+ or NRF24L01+PA+LNA)
|
| 1x NRF24L01 adapter (recommended) $1.22 |
| 1x L298N $10.99 |
| 1x Voltage regulator with 5V output (AMS1117)
|
| 1x Buzzer
|
| Dupont wires
|


Original state and cleanup
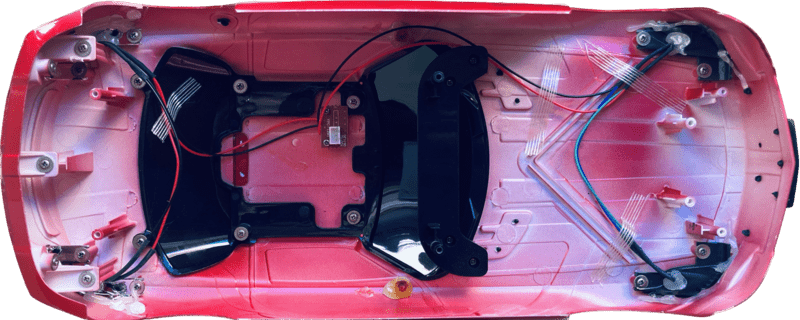
To start mounting new components, we need to first unmount the existing ones and ensure that we keep the necessary elements. The original state of the car and its internal components can be seen in the image below.
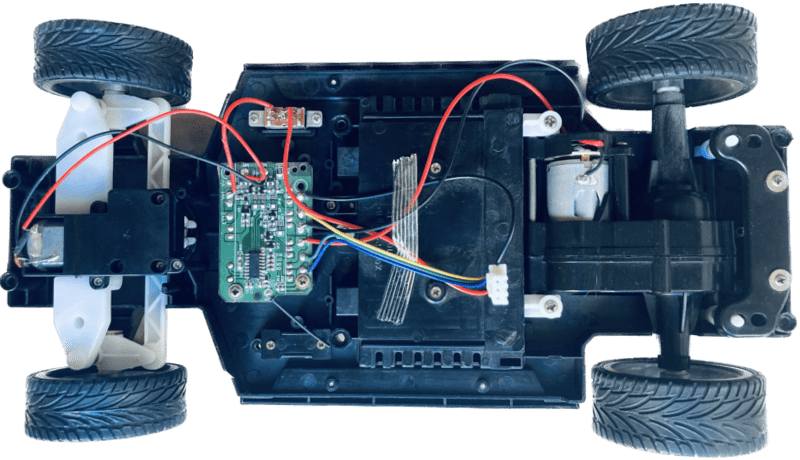
The headlights and brake lights are installed on the top frame, providing a convenient 3-pin connector. Our intention is to keep the wiring and improve their functionality in code.
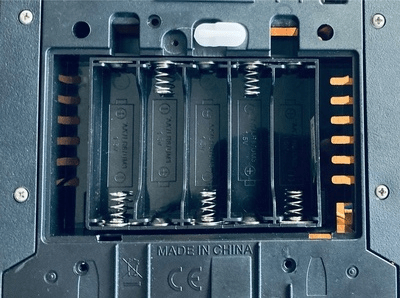
In our prototype, the AA batteries box will be removed and replaced with 9V battery. Given that the L298N module has a 2V voltage drop, we can expect a similar final voltage. For other components, and to provide a stable current, AMS1117 voltage regulator will be added.
After removing all the unnecessary components from the car, we begin the process of designing and mounting our custom circuitry.
System assembly and integration
The only remaining elements are the suspension, direction, motors, and lights. We aim to not only utilize those existing elements but also enhance their functionality. To control the direction and speed of the motors, we will be using the L298N module. This particular module has the capability to control up to two DC motors at once, allowing for precise and efficient control over the movement of the vehicle. Exactly what we need.

Direction motor
In our initial plans, we aimed to make possible various turning angles for the car. However, evaluating the original direction motor, we realized it wouldn't be adequate for that. Therefore, the car's direction will only have three states: left, right, and none. However, we have expanded the turning range of the vehicle by removing a small plastic section located on the wheels direction.
Speed motor
Initially, the motors could only apply full throttle. Our objective is to enhance this functionality by enabling a variable speed control, which would allow the motors to steadily increase or decrease their velocity, or sustain a constant speed.
While these cars don't come with built-in braking, we can use the motors to slow down and stop the vehicle. We'll do this by reducing the motor speed, either to a lower speed or to zero.
Finally we'll simulate inertia by gradually reducing the speed over time.
Additional features
Our intention was to incorporate the head and brake lights of the car into our design. The original lights were designed to be continuously on and couldn't be turned off. We are going to improve that functionality by enabling the lights to be turned on and off. Furthermore, we aimed to provide independent control of the headlights. On the other side, to ensure that the brake lights are easily distinguishable, we have set the default position lights intensity slightly lower than that of the brake lights.
An added function we are incorporating is a horn that utilizes a buzzer to generate sound. It can be triggered by a dedicated button on the joystick.
Microcontroller
The car's functions, such as the motor controller, lights, and direction control, will be coordinated and controlled by an Arduino Nano, which will serve as the brain and central hub for all of the car's features. Additionally, as the goal is to pair Merin with the AirControl joystick, the Arduino Nano will communicate with the joystick via an NRF24L module. This wireless communication will allow greater flexibility controlling the car, as well as enabling potential future modifications.
Wiring schema
The power source for the remote-controlled car is a 9V battery, which will provide enough power to supply the circuit and both motors for speed and direction control. The buzzer, lights, and NRF24L01 communication module are directly connected to the Arduino Nano. The use of a 9V battery is a good choice as it provides enough voltage to run the system without being too heavy for the vehicle.
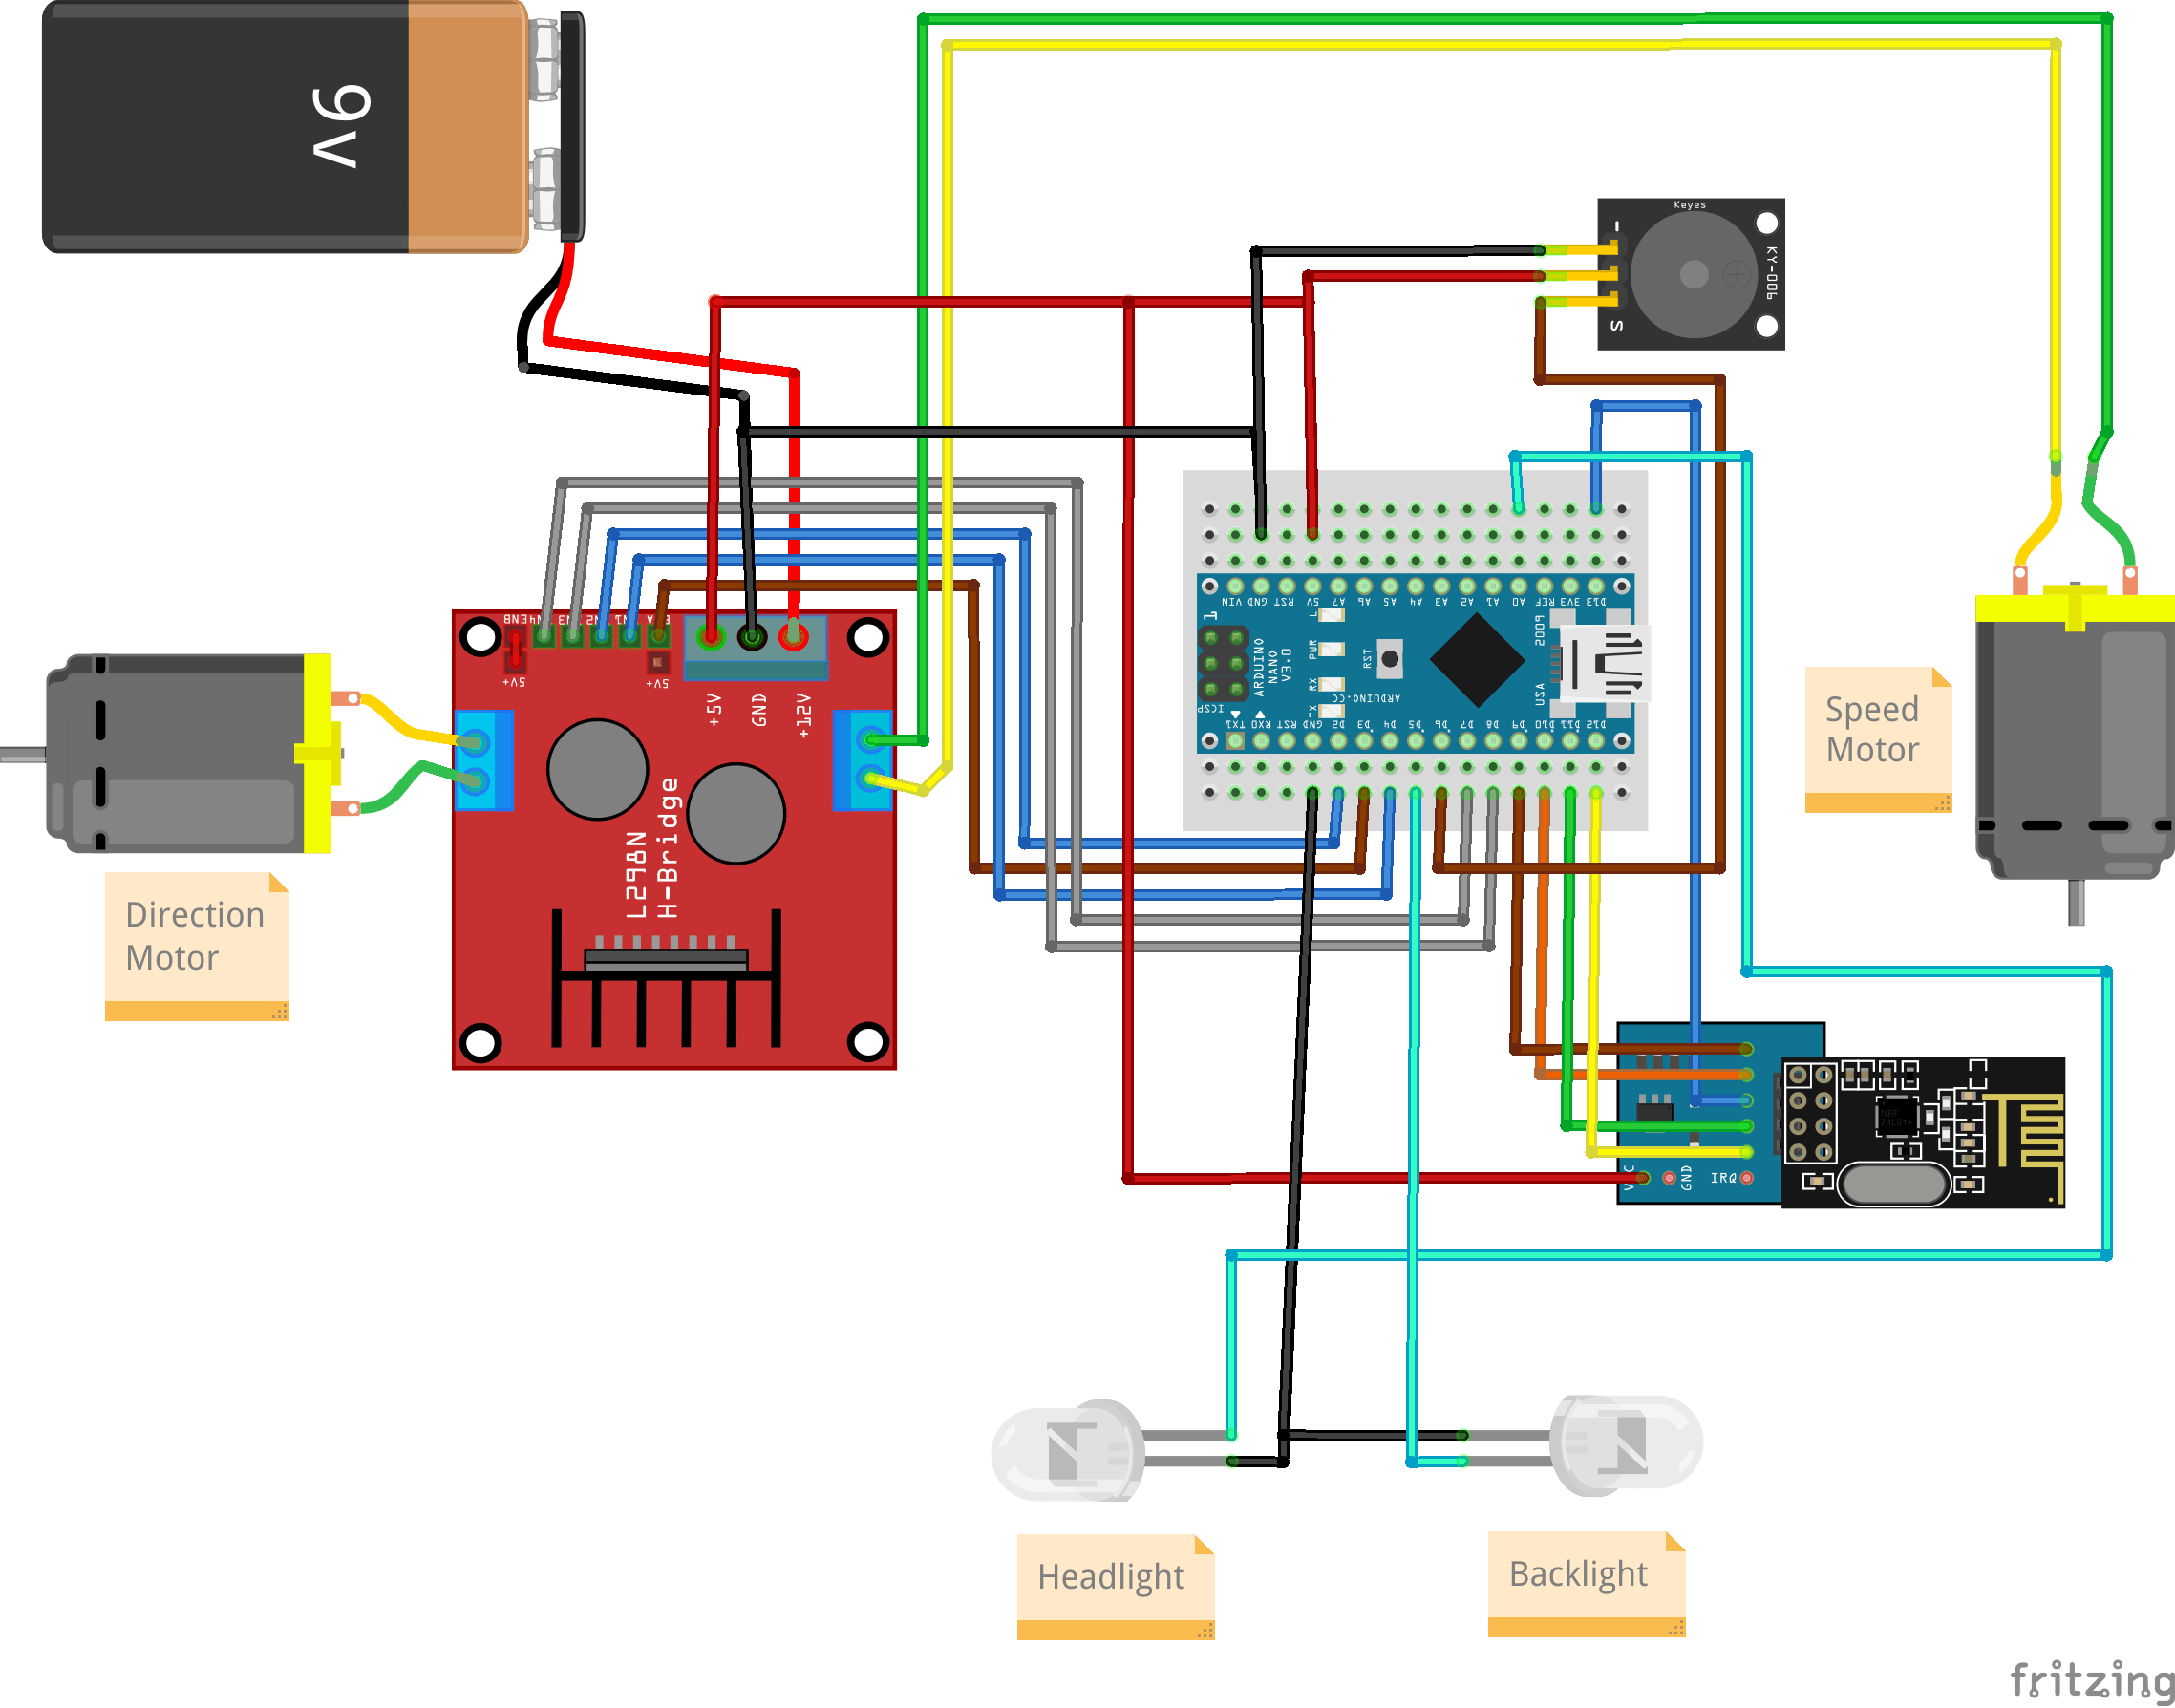
The ENB jumper has been set on the L298N module, which indicates that the direction motor will not support PWM but will only respond to HIGH and LOW signals.
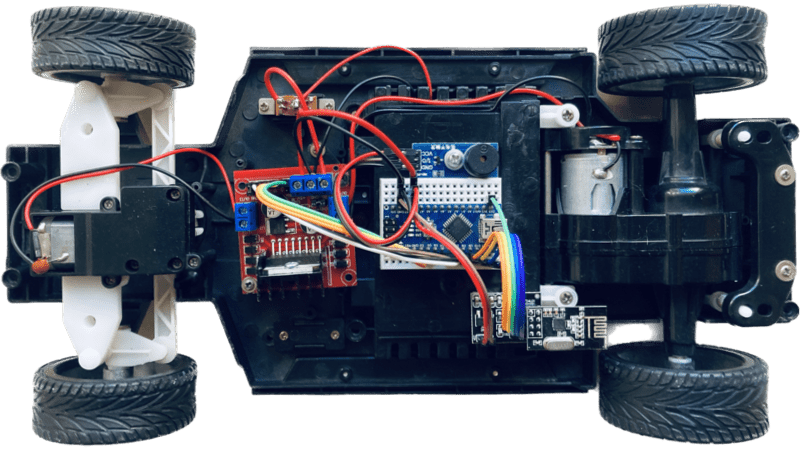
The final circuitry has been carefully mounted onto the frame of the car. This circuitry allows new features to be implemented, including the ability to control the speed of the vehicle, turn on and off the lights, and even honk the horn.
Conclusion
By using the Arduino Nano and NRF24L module, we can create a customized remote-controlled car with a wide range of features that can be controlled by a joystick. The modifications we made to the car will not only make it more enjoyable to use but also increase its versatility beyond its original capabilities.
In the following posts, we will provide information regarding the programming required to connect the car with the AirControl joystick.


0 Comments