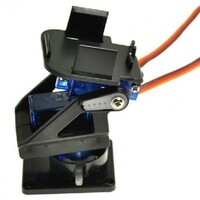
arduino


How to use potentiometer with Arduino

  • avatar
  • 2.7K Views
  • 3 Likes
  • 4 mins read
Preview post image

A potentiometer is a simple knob that provides a variable resistance, which we can read into the Arduino board as an analog value. They can be attuned from zero ohms to whatever maximum resistance that is specific to it. For example, a potentiometer of 10 kΩ can be adjusted from 0 Ω to its maximum of 10 kΩ.

How to control mini water pump with Arduino

  • avatar
  • 1.8K Views
  • 1 Like
  • 7 mins read
Preview post image

The advent of Arduino microcontrollers has revolutionized the world of electronics and automation. With their user-friendly interface and vast array of modules and sensors, Arduino boards have become the go-to choice for hobbyists and professionals alike. In this article, we will explore the significance of a 5V water pump module, the importance of using transistors, and how to effectively connect the two to create an efficient water control system.

What is PWM and how it works

  • avatar
  • 2.2K Views
  • 1 Like
  • 3 mins read
Preview post image

Pulse Width Modulation (PWM) is a technique for getting analog results with digital means. Digital control is used to create a square wave, a signal switched between ON and OFF. If you repeat this on/off pattern fast enough with a LED for example, the result is as if the signal is a steady voltage between 0 and VCC controlling the brightness of the LED.

 Join Our Monthly Newsletter

Get the latest news and popular articles to your inbox every month

We never send SPAM nor unsolicited emails

Using push buttons with Arduino

  • avatar
  • 2.1K Views
  • 1 Like
  • 4 mins read
Preview post image

Today we are going to speak about push buttons, the wiring and how to implement the code for this circuit elements in Arduino. Push buttons connect two points in a circuit when you press them. That means that logic state of the circuit change when you press and keep pressed the button.

How to use an analog module with Arduino

  • avatar
  • 2.0K Views
  • 1 Like
  • 4 mins read
Preview post image

The KY-023 is an easy-to-use analog joystick. The joystick uses a biaxial potentiometer to control the X and Y axis. It also has an integrated push button. In this tutorial, it is shown how to connect the KY-023 joystick with the Arduino and how to use it.

How to use tricolor LED module with Arduino

  • avatar
  • 1.9K Views
  • 3 Likes
  • 4 mins read
Preview post image

The KY-016 is capable of producing wide range of different colors by mixing blue, green and red lights. The RGB LED module will not require any limiting resistors. Those resistors are already integrated in the circuit, and so 5V can be directly used as power input.

DIY - Remote control car running on Arduino: code

  • avatar
  • 1.3K Views
  • 2 Likes
  • 9 mins read
Preview post image

The physical assembly of the car has been completed with all the components properly installed and ready for use. The next steps involve reprogramming the Arduino Nano with the appropriate software to enable all the features, including pairing the car with the AirControl joystick via the NRF24L01 module.

DIY - Remote control car running on Arduino

  • avatar
  • 1.3K Views
  • 2 Likes
  • 18 mins read
Preview post image

Radio control cars are small vehicles powered by electric or gas motors that can be remotely controlled by a transmitter. The transmitter sends signals to a receiver on the car, allowing the operator to control the car's speed, direction, and steering. Radio control cars are available in a variety of sizes, from miniature models that can fit in the palm of your hand to large off-road vehicles that can climb over rough terrain.

Pull-up and Pull-down resistors

  • avatar
  • 1.7K Views
  • 4 mins read
Preview post image

A resistor is a passive two-terminal electrical component that implements electrical resistance as a circuit element. In electronic circuits, resistors are used to reduce current flow and adjust signal levels among other uses. Resistance is measured in Ohm with a sign of Ω.

A microcontroller (e.g. Arduino) utilizes I/O signals for communication with external hardware devices, where the most commonly known being GPIO. As a reminder, digital logic circuits have three logic states: high, low and floating (or high impedance). When there’s nothing connected to your GPIO pins, your program will read a floating impedance state, which we do not want. To achieve either high or low states, we’ll have to implement pull-up or pull-down resistors in our digital circuit.

Interfacing laser diode module with Arduino

  • avatar
  • 1.1K Views
  • 4 mins read
Preview post image

Laser modules emit highly focused beams of light, making them ideal for a wide range of applications. One of the key aspects of a laser module is its power output, typically measured in milliwatts (mW). Arduino compatible laser modules typically have a power output within the lower range ensuring safety and compatibility with the microcontroller board. It's important to note that modules require safety precautions due to their increased risk of eye damage and potential fire hazards for higher-power lasers.