DIY - Remote control car running on Arduino: mounting

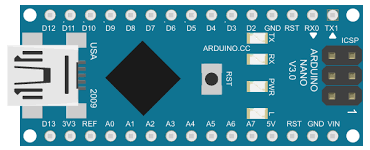
With the idea of making a remote-controlled car in mind, we began our investigation by disassembling the frame to uncover its internal components and understand how they work. By gaining a clear understanding of the car's original configuration, we were able to approach the modifications with greater confidence, knowing what changes were necessary and how they would integrate with the existing system.