Arduino IDE


How to use an analog module with Arduino

  • avatar
  • 2.1K Views
  • 1 Like
  • 4 mins read
Preview post image

The KY-023 is an easy-to-use analog joystick. The joystick uses a biaxial potentiometer to control the X and Y axis. It also has an integrated push button. In this tutorial, it is shown how to connect the KY-023 joystick with the Arduino and how to use it.

How to use tricolor LED module with Arduino

  • avatar
  • 1.9K Views
  • 3 Likes
  • 4 mins read
Preview post image

The KY-016 is capable of producing wide range of different colors by mixing blue, green and red lights. The RGB LED module will not require any limiting resistors. Those resistors are already integrated in the circuit, and so 5V can be directly used as power input.

DIY - Remote control car running on Arduino

  • avatar
  • 1.5K Views
  • 2 Likes
  • 18 mins read
Preview post image

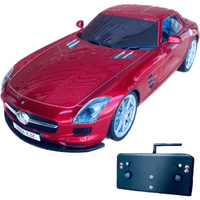
Radio control cars are small vehicles powered by electric or gas motors that can be remotely controlled by a transmitter. The transmitter sends signals to a receiver on the car, allowing the operator to control the car's speed, direction, and steering. Radio control cars are available in a variety of sizes, from miniature models that can fit in the palm of your hand to large off-road vehicles that can climb over rough terrain.

 Join Our Monthly Newsletter

Get the latest news and popular articles to your inbox every month

We never send SPAM nor unsolicited emails

DIY - Remote control car running on Arduino: code

  • avatar
  • 1.4K Views
  • 2 Likes
  • 9 mins read
Preview post image

The physical assembly of the car has been completed with all the components properly installed and ready for use. The next steps involve reprogramming the Arduino Nano with the appropriate software to enable all the features, including pairing the car with the AirControl joystick via the NRF24L01 module.

Pull-up and Pull-down resistors

  • avatar
  • 1.8K Views
  • 4 mins read
Preview post image

A resistor is a passive two-terminal electrical component that implements electrical resistance as a circuit element. In electronic circuits, resistors are used to reduce current flow and adjust signal levels among other uses. Resistance is measured in Ohm with a sign of Ω.

A microcontroller (e.g. Arduino) utilizes I/O signals for communication with external hardware devices, where the most commonly known being GPIO. As a reminder, digital logic circuits have three logic states: high, low and floating (or high impedance). When there’s nothing connected to your GPIO pins, your program will read a floating impedance state, which we do not want. To achieve either high or low states, we’ll have to implement pull-up or pull-down resistors in our digital circuit.

Interfacing laser diode module with Arduino

  • avatar
  • 1.2K Views
  • 4 mins read
Preview post image

Laser modules emit highly focused beams of light, making them ideal for a wide range of applications. One of the key aspects of a laser module is its power output, typically measured in milliwatts (mW). Arduino compatible laser modules typically have a power output within the lower range ensuring safety and compatibility with the microcontroller board. It's important to note that modules require safety precautions due to their increased risk of eye damage and potential fire hazards for higher-power lasers.
Keeping time with DS1302: real-time clock on Arduino

  • avatar
  • 1.1K Views
  • 8 mins read
Preview post image

In the fascinating world of Arduino and microcontrollers, keeping time is key. You might need to build a digital clock, a timer, or something more complex like an automated plant watering system. That's where the DS1302 module steps in. It's a handy little device that can help you keep time accurately in your Arduino projects. In this article, we'll take a closer look at the DS1302 module, understand how it works, and explore its applications.

DIY - Universal RC Joystick

  • avatar
  • 1.3K Views
  • 8 Likes
  • 23 mins read
Preview post image

Controlling devices over a distance opens lots of possibilities. Our Arduino roadmap contains many projects that must be controlled remotely and sometimes on a long-distance. Of course, it can be done with a PC but our experience has shown that it becomes complicated when you need long way, portable and rapid communications. Our solution was designing a multi-functional remote controller, we have called it AirControl. Aware of the needs it will have 4 push buttons, 2 switch buttons, 2 potentiometers and two analog modules. Additionally, each analog joystick module has integrated push button.

DIY - Universal RC Joystick: receiver

  • avatar
  • 1.2K Views
  • 1 Like
  • 10 mins read
Preview post image

Wireless communication implies having a transmitter, in our case the joystick, and a receiver. We must build a simple circuit with NRF24L01 wiring that will act as listener for our joystick. The NRF24L01 module strictly needs 3.3V but the logic pins are 5V tolerant. That why we recommend to use the NRF24L01 adapter which acts as regulator, keep the voltage stable, apply filtering and reduce noises.

Play Home Alone song with a piezo buzzer and Arduino

  • avatar
  • 1.2K Views
  • 3 Likes
  • 7 mins read
Preview post image

Home Alone has since been considered one of the best Christmas films and Somewhere in My Memory has been nominated as best original song. We wanted to recreate the melody of the film's theme song with a piezo buzzer and share with you. Buzzer is used to generate sound, beep or even melody of a song. It can be found in alarm devices, computers, timers and confirmation of user input such as a mouse click or keystroke.